<?xml version="1.0" encoding="utf-8"?>
<feed xmlns="http://www.w3.org/2005/Atom">
  <title>Sauceda's Security Stack</title>
  <subtitle>Cybersecurity writeups, reflections, and projects</subtitle>
  <link href="https://saucedasecurity.com/feed.xml" rel="self"/>
  <link href="https://saucedasecurity.com/"/>
  <updated>2026-03-19T00:00:00Z</updated>
  <id>https://saucedasecurity.com/</id>
  <author>
    <name>Benito Sauceda</name>
  </author>
  <entry>
    <title>CVE-2015-9235 - JWT Key Confusion Exploit</title>
    <link href="https://saucedasecurity.com/posts/JWT_HashConfusion/"/>
    <updated>2026-03-19T00:00:00Z</updated>
    <id>https://saucedasecurity.com/posts/JWT_HashConfusion/</id>
    <content type="html"><![CDATA[
      <p><em>Note from the Author:</em> Welcome to the second post in my CVE of the week series! This post was a bit later because I've been studying for exams this week. Anyways,
this post covers not just one CVE, but a vulnerability class that keeps recurring (CWE-347 (Improper Verification of Cryptographic Signature)). It was first researched by Canadian security researcher Tim McLean in 2015. However, being older than a decade does not mean it’s irrelevant… For example: CVE-2026-22817 (affecting the Hono web framework) was disclosed this year. But, for the sake of this post, I’m labeling it with the original CVE assigned to the JWT vulnerability: CVE-2015-9235.</p>
<p>As always, there’s an accompanying github repo for this week’s CVE, if you’re interested in more details about the configs and whatnot: <em><a href="https://github.com/paperclipsvinny/cve-of-the-week">github.com/paperclipsvinny/cve-of-the-week</a></em></p>
<h3>At-A-Glance</h3>
<p><span class="label">CVE ID:</span> CVE-2015-9235<br>
<span class="label">Description:</span> JWT Algorithm Confusion / Key Confusion Attack<br>
<span class="label">CWE:</span> CWE-347 – Improper Verification of Cryptographic Signature<br>
<span class="label">Disclosed:</span> March 31, 2015<br>
<span class="label">Researcher:</span> Tim McLean<br>
<span class="label">Severity:</span> 7.5 (High)<br>
<span class="label">Exploit Type:</span> Authentication Bypass<br>
<span class="label">Software Affected:</span> JWT libraries that trust the &quot;alg&quot; header without enforcement:<br>
node-jsonwebtoken (&lt; 4.2.2), pyjwt, namshi/jose, php-jwt, jsjwt<br>
<span class="label">Notable Victims:</span><br>
<span class="label">2023:</span> CVE-2023-48223 – fast-jwt (&lt; 3.3.2)<br>
<span class="label">2026:</span> CVE-2026-22817 – Hono framework (&lt; 4.11.4), CVSS 8.2</p>
<h2>Background</h2>
<p>Background: How JWT Algorithm Confusion Works:
To understand how a JSON Web Token (JWT) algorithm confusion attack occurs, you first need to understand how JWTs work. Each token has three parts, encoded in base64, and separated by a dot. Those three parts are: <br>
1 - Header <br>
2 - Payload/contents <br>
3 - signature <br></p>
<p>The Header contains information to identify the rest of the token. First, it identifies itself as a JWT in the <code>”typ”: “JWT”</code> field, and second, it identifies which algorithm it’s signed with in the <code>(alg)</code> field. Where this comes into play is when you have a server that expects a token to use RS256 (which is asymmetric), but trusts the token’s <code>alg</code> value instead of enforcing what it expects. Thus, an attacker can modify the JWT token to a different algorithm, such as HS256, which is symmetric, and sign it with the public key provided for RS256 signing.</p>
<p>Because the server blindly trusts the modified alg value, it switches to use HS256 verification with the key it has available (the same RS256 public key). Thus, the server verifies the fake, forged token (signed by the attacker) and validates the attacker.</p>
<p>By the way, I was inspired to explore this attack vector after seeing a similar challenge on UTCTF 2026.</p>
<h3>Scope &amp; Authorization</h3>
<p>This testing was conducted on OWASP Juice Shop, a vulnerable web app expressly designed for security testing. The application was hosted on an offline cyber range, for educational and defensive security research purposes only. I conducted this testing ethically, with express authorization.</p>
<h2>Inspiration (A CTF Tangent)</h2>
<p>The inspiring CTF challenge I mentioned earlier had a challenge which looked something like this: The UTCTF challenge used JWE encryption; the token was encrypted with RSA-OAEP-256 and A256GCM. The solution involved using the exposed public key to encrypt a forged payload. While researching that, I discovered a related but different attack class: JWT algorithm confusion, which targets signed tokens rather than encrypted ones. Either way, I wanted to include the CTF notes from the challenge, just for fun. First, you were given a banking website with ‘state of the art’ security:</p>
<div class="image">
  <img src="/Assets/images/postimages/JWTHashConfusion/fnsblogin.png" alt="CTF Login Page">
</div>
<p>
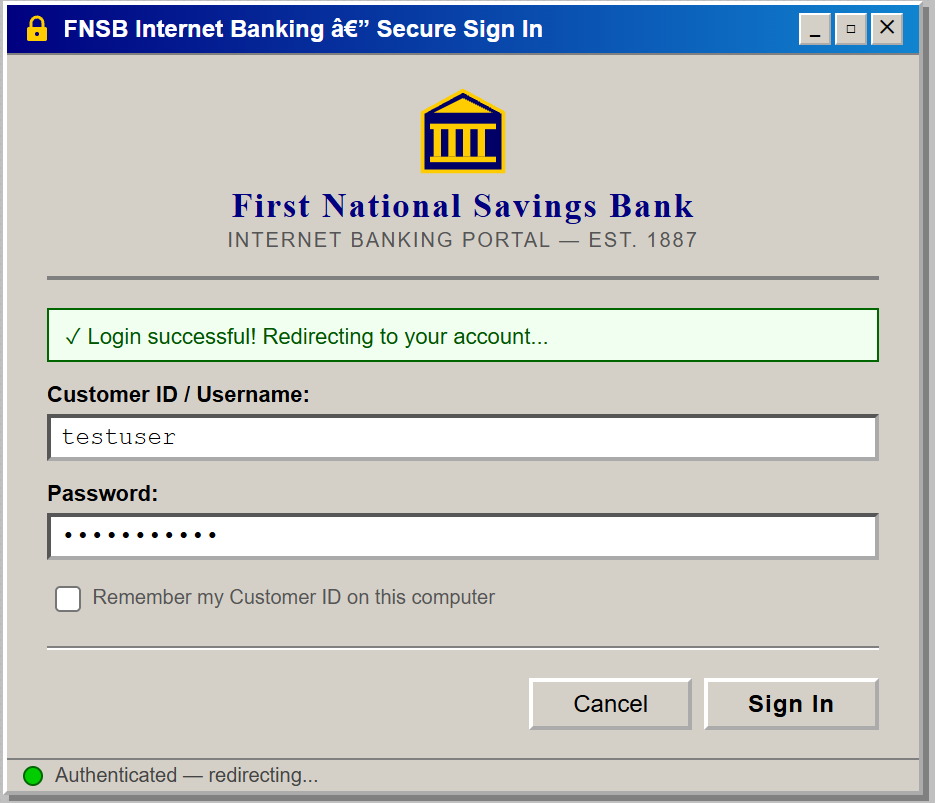
The website operates on JWE with a nested JWT
the first part of the cookie is the same string and is encoded in base64:{&quot;cty&quot;:&quot;JWT&quot;,&quot;enc&quot;:&quot;A256GCM&quot;,&quot;alg&quot;:&quot;RSA-OAEP-256&quot;}</p>
<p>After enumerating the website further, I found the /resources/ endpoint, which contained a public key at /key.pem.</p>
<p>Then, the solution to the challenge was to use the key to encrypt a token to get the flag. Like I said, it was while doing research for this challenge that I learned about JWT Algorithm Confusion.</p>
<h2>Lab Setup</h2>
<div class="image">
  <img src="/Assets/images/postimages/JWTHashConfusion/Juice Shop Logo.jpg" alt="The picture of Juice Shop's Logo">
  <figcaption>OWASP Juice Shop's Cool Logo: <a href="https://github.com/juice-shop" target="_blank">Source</a></figcaption>
</div>
<p>
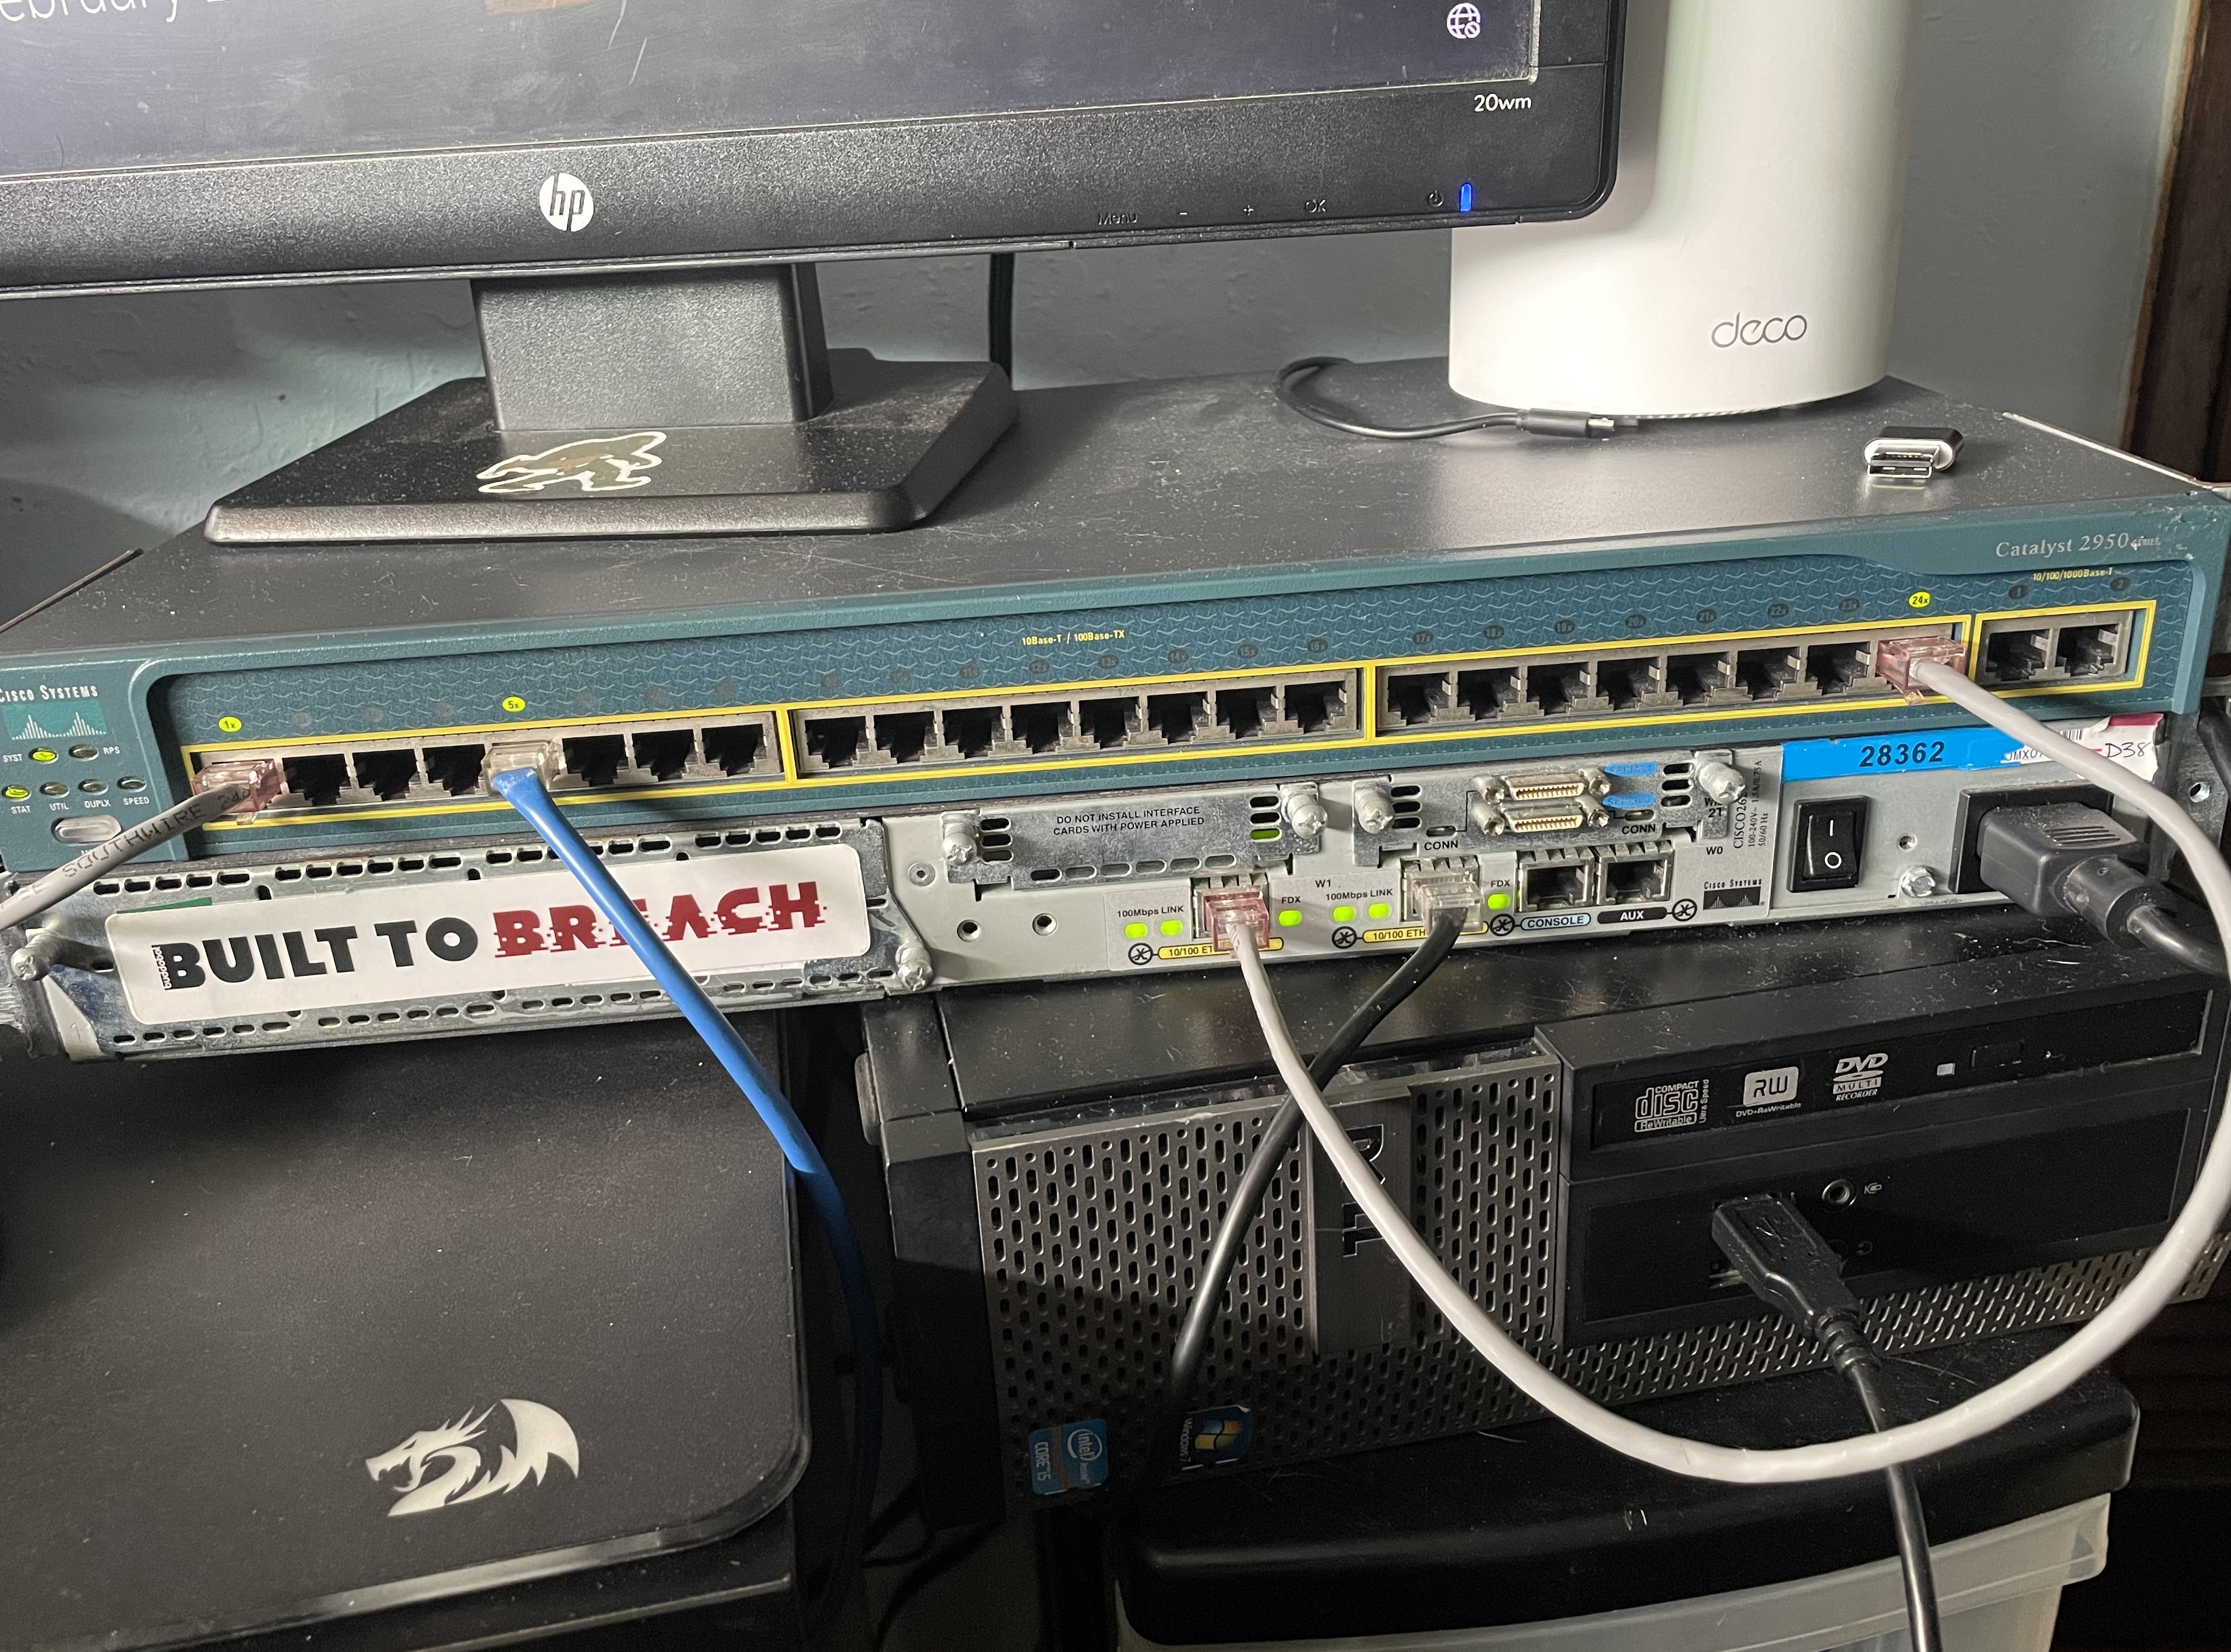
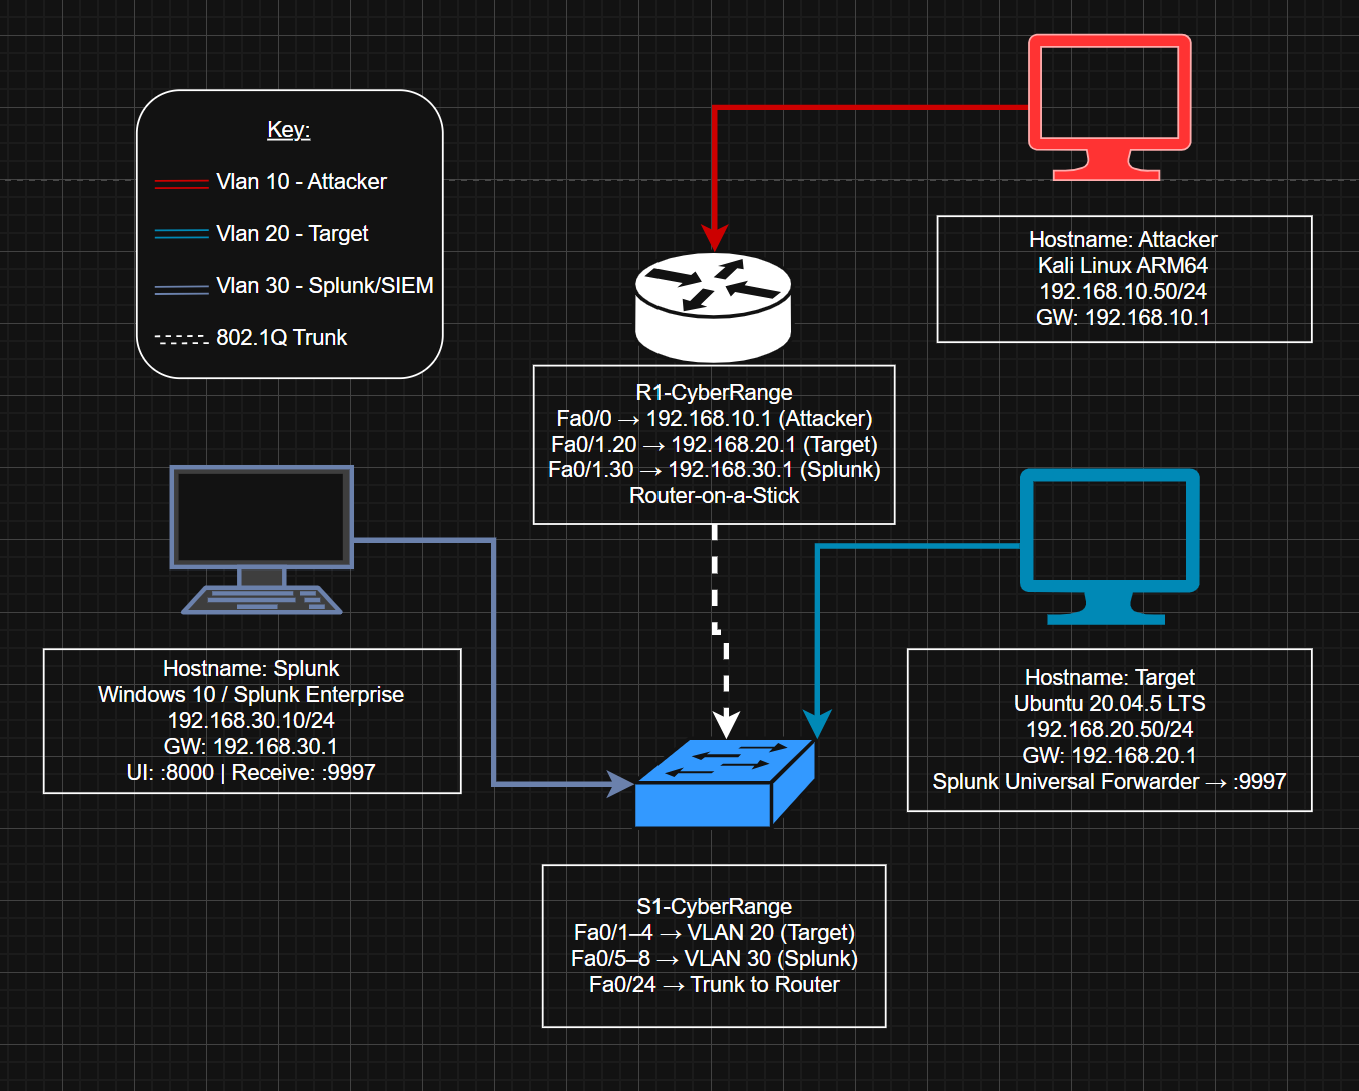
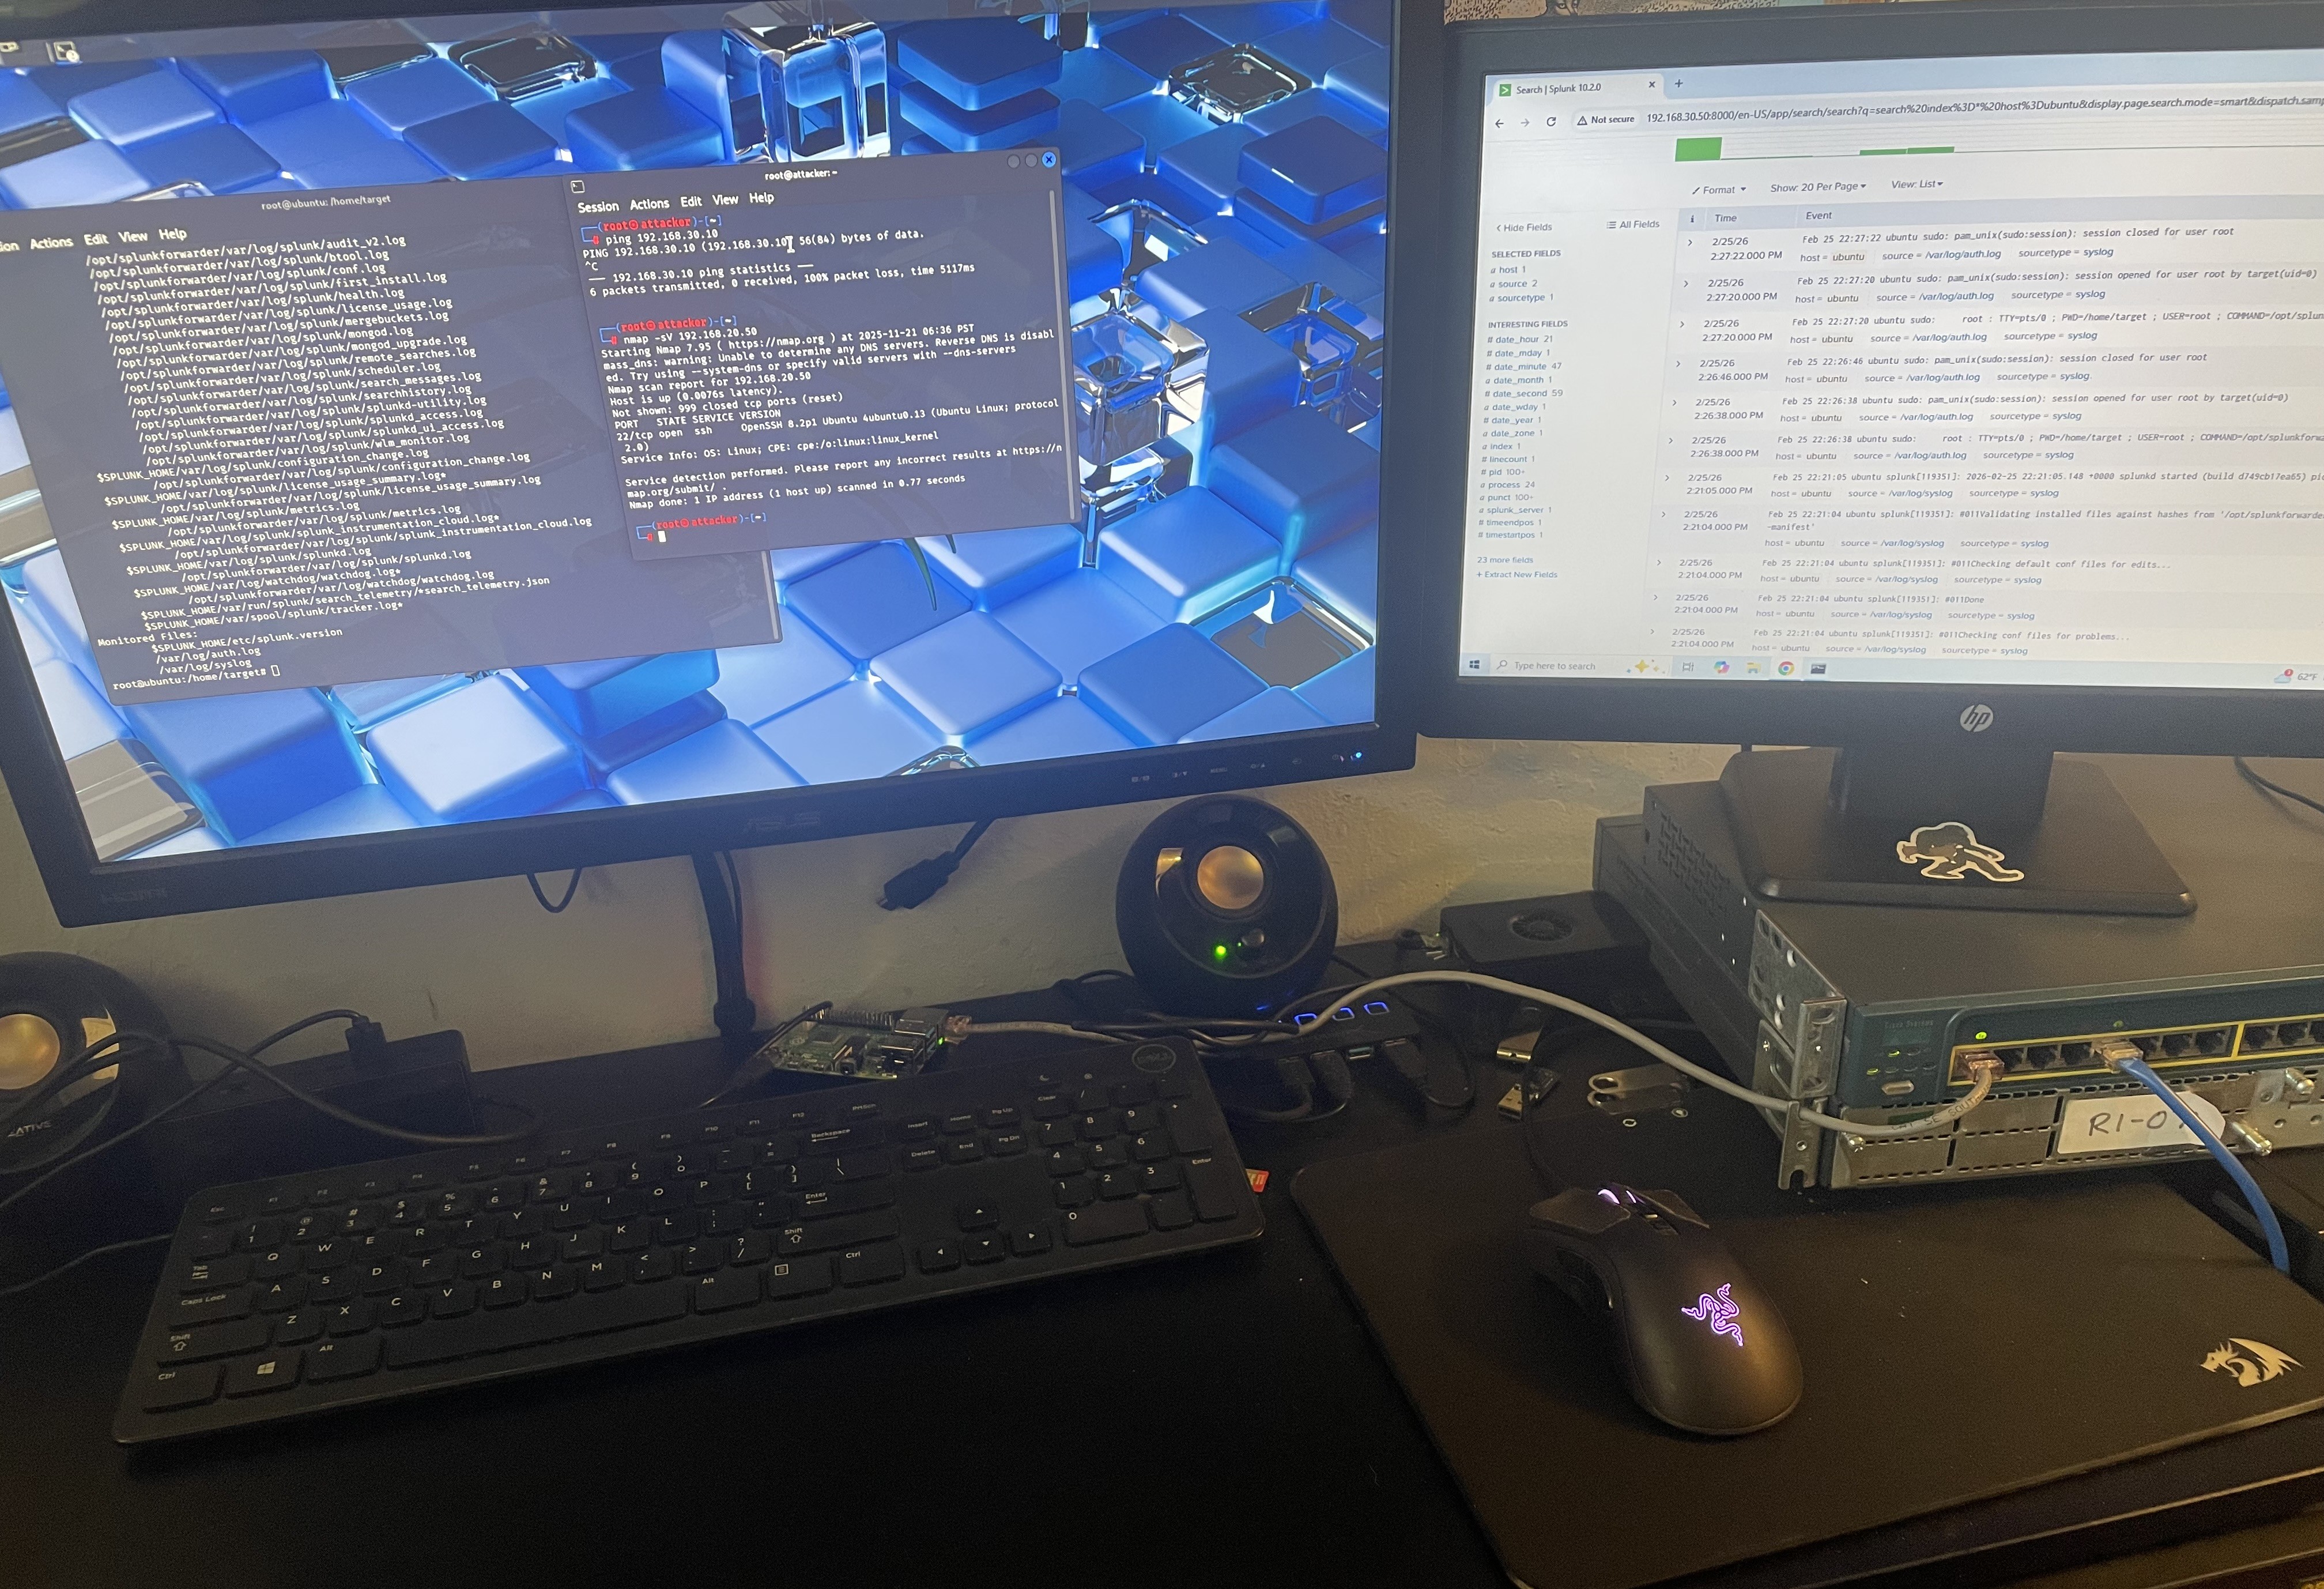
I had a local version of juice shop running on a docker container on my Ubuntu 20.04 LTS server.
I also installed Ticarpi’s jwt_tool project from github, which helped with crafting forged JWT payloads.</p>
<p><strong>Juice shop</strong>: 192.168.20.50:80 (mapped to docker container on 3000) <br>
<strong>Attacker</strong>: 192.168.10.50 (Kali Lite)</p>
<h2>Initial Recon</h2>
<p>
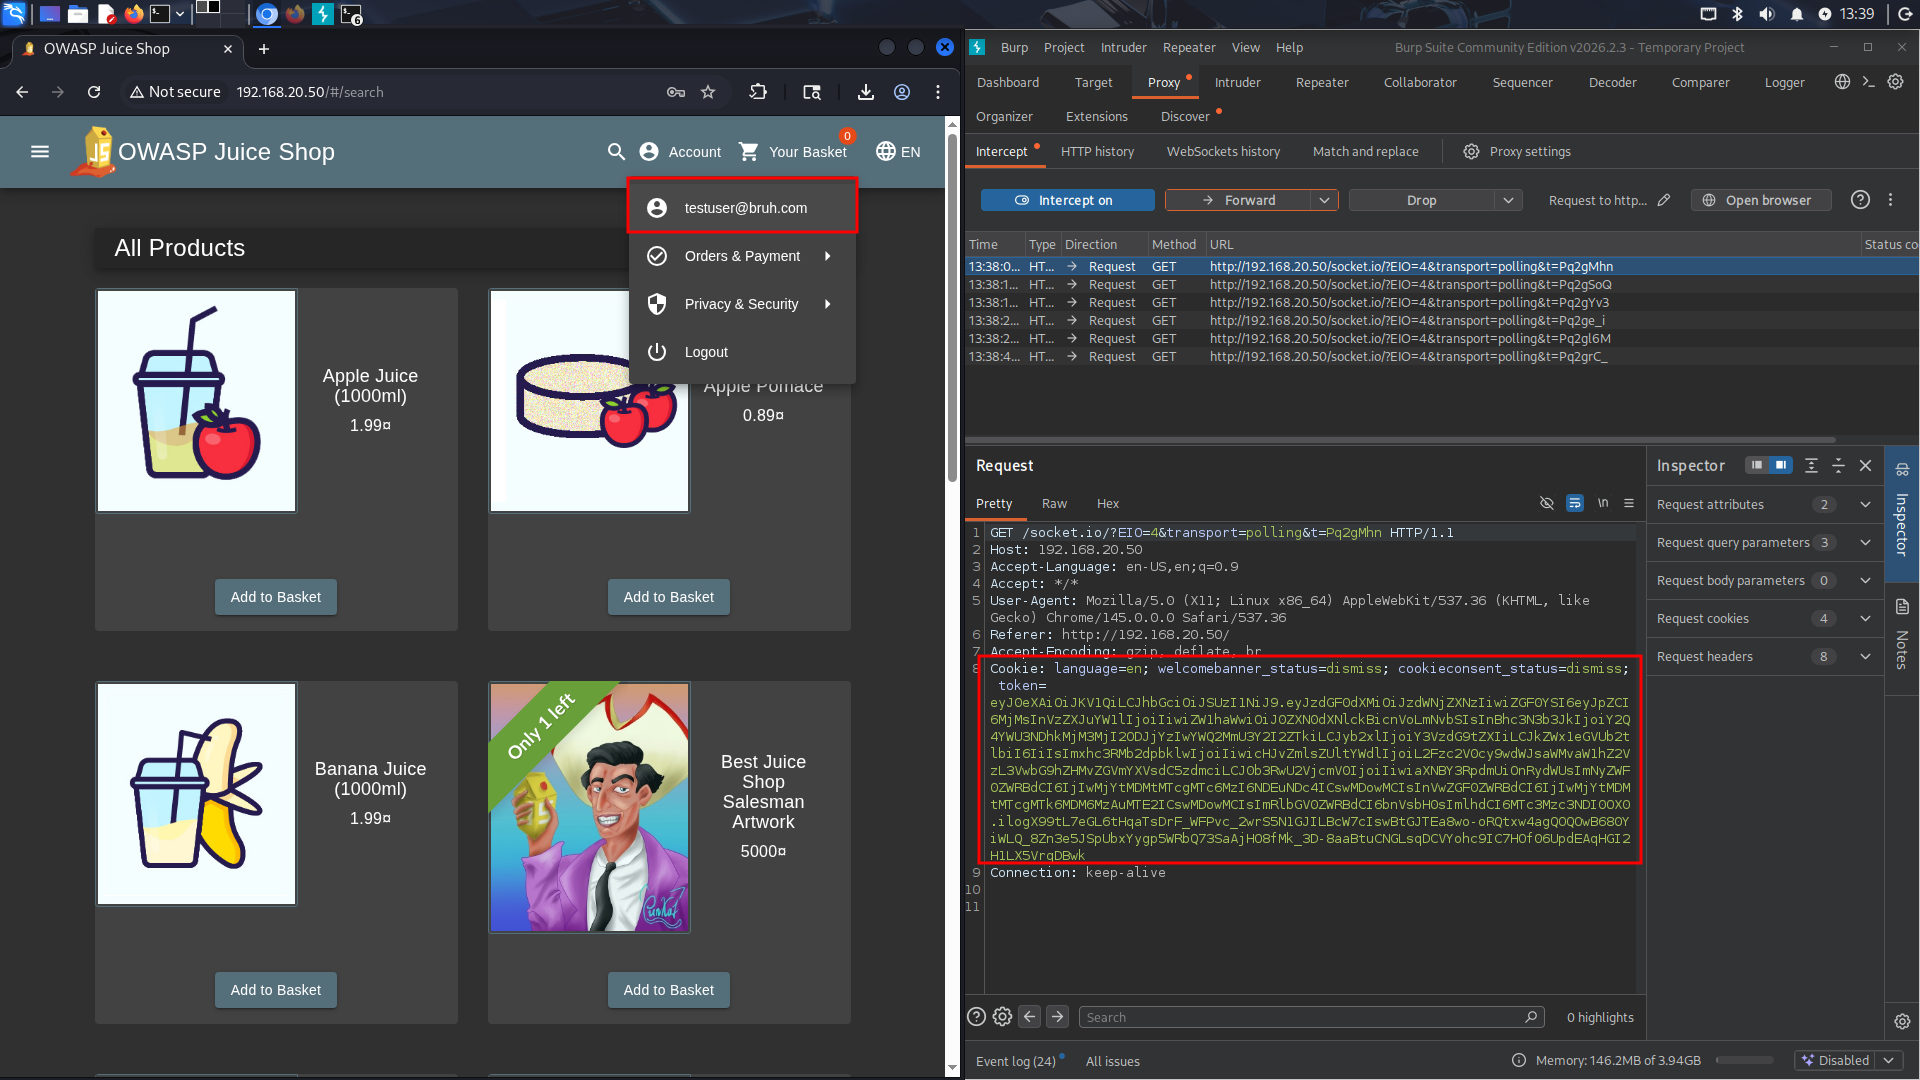
The first step in my methodology was to create a legitimate user (testuser@bruh.com).
After I was logged in as that user, I captured the cookies given in Burpsuite, and saved them for later. I then moved to finding the public RSA key we could use for this attack.</p>
<div class="image">
  <img src="/Assets/images/postimages/JWTHashConfusion/appflow.png" alt="Screenshot showing the logic behind the website">
  <figcaption>Testuser@bruh.com might not be my best testing username, but it's certainly not my worst.</figcaption>
</div>
<p>Initial enumeration failed because standard gobuster returned false positives — Juice Shop returns 200 for all pages (SPA behavior). I then switched to using content length as a filter for illegitimate pages. This led to some good endpoints but did not find anything that looks related to encryption keys. I also tried a more manual search in the JavaScript source at this time, to find any references that directory bruteforcing would miss, but came up empty (it’s not being referenced client side).
Thus, I decided to retry fuzzing but with some common key endpoints, using a list I had AI generate for me.</p>
<div class="image">
  <img src="/Assets/images/postimages/JWTHashConfusion/gobuster_enumeration.png" alt="Screenshot showing the results of a gobuster scan.">
  <figcaption>@firefart, now there's a good username. </figcaption>
</div>
<p>
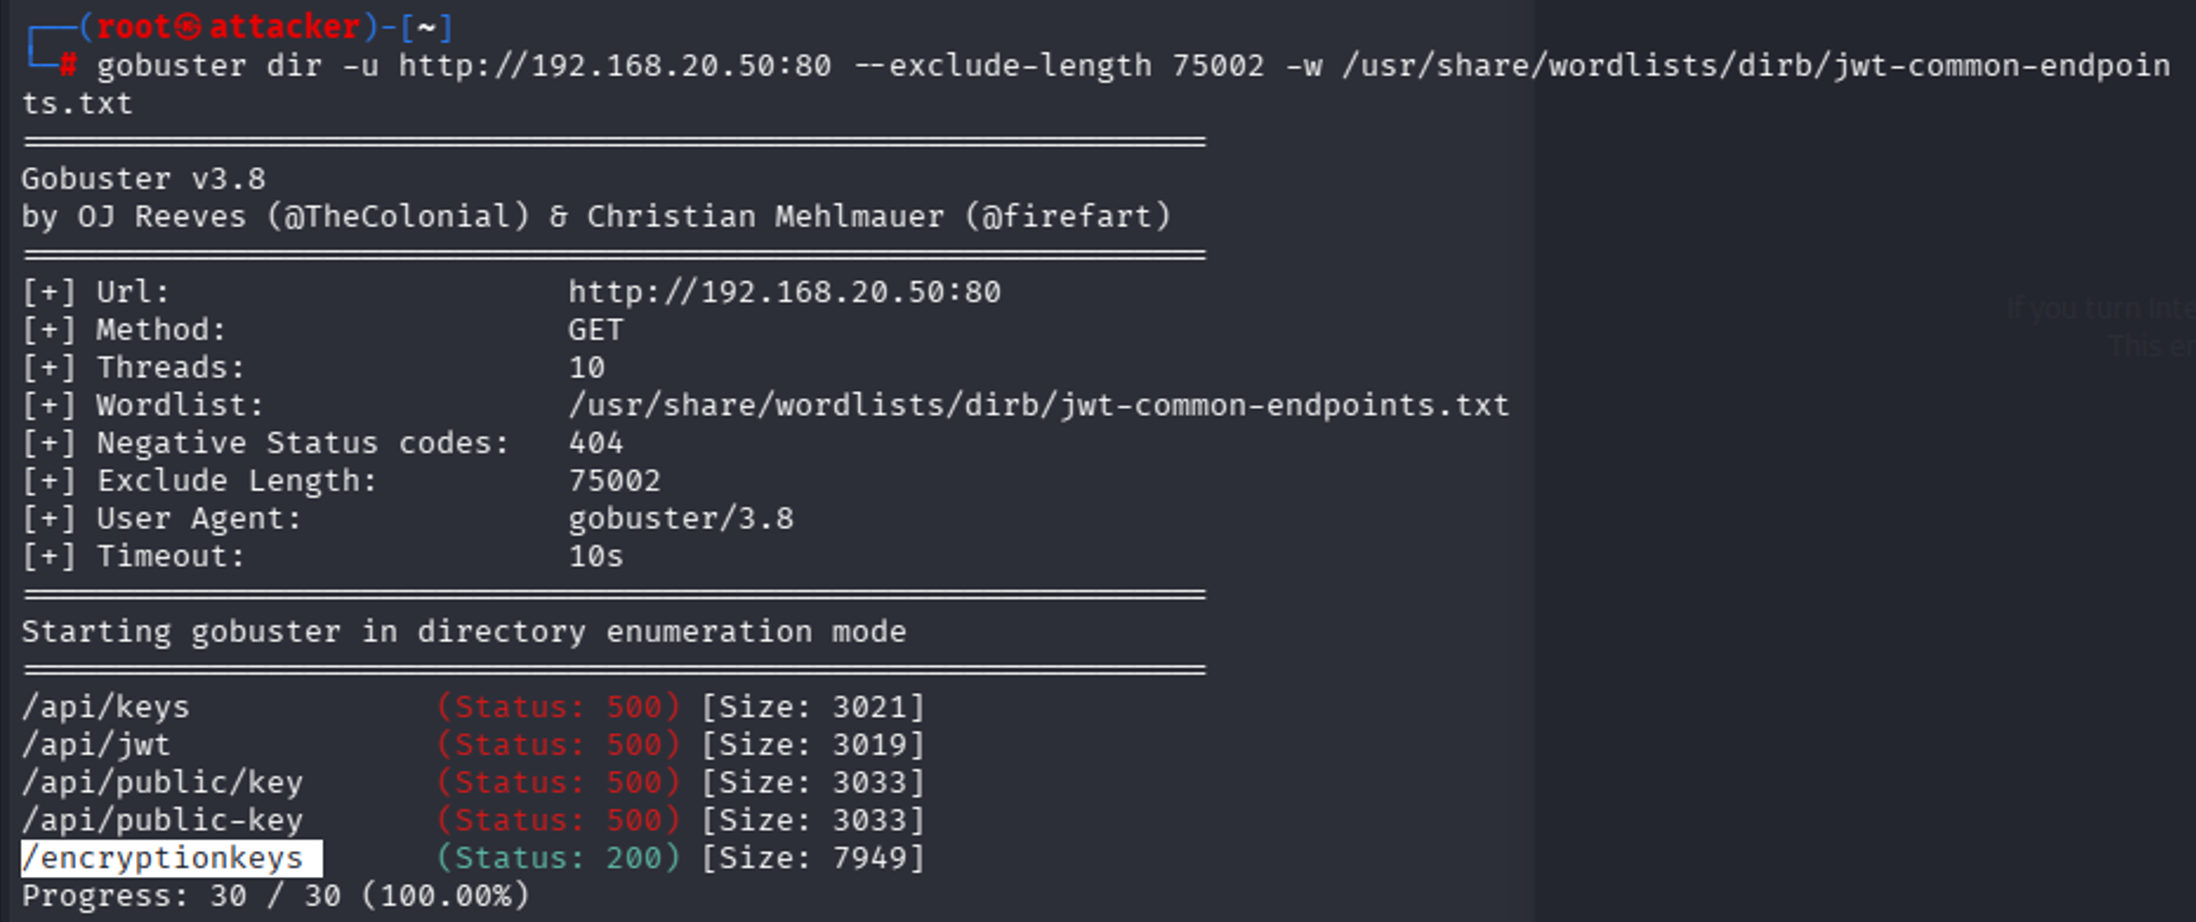
I think all the API ones false positive just because we get a 500 error from anything from the API endpoint, but we can also see there’s a /encryptionkeys endpoint.</p>
<div class="image">
  <img src="/Assets/images/postimages/JWTHashConfusion/encryptionkeysdirectorycontents.png" alt="/encryptionkeys endpoint">
  <figcaption>Contents of the /EncryptionKey Folder</figcaption>
</div>
<p>
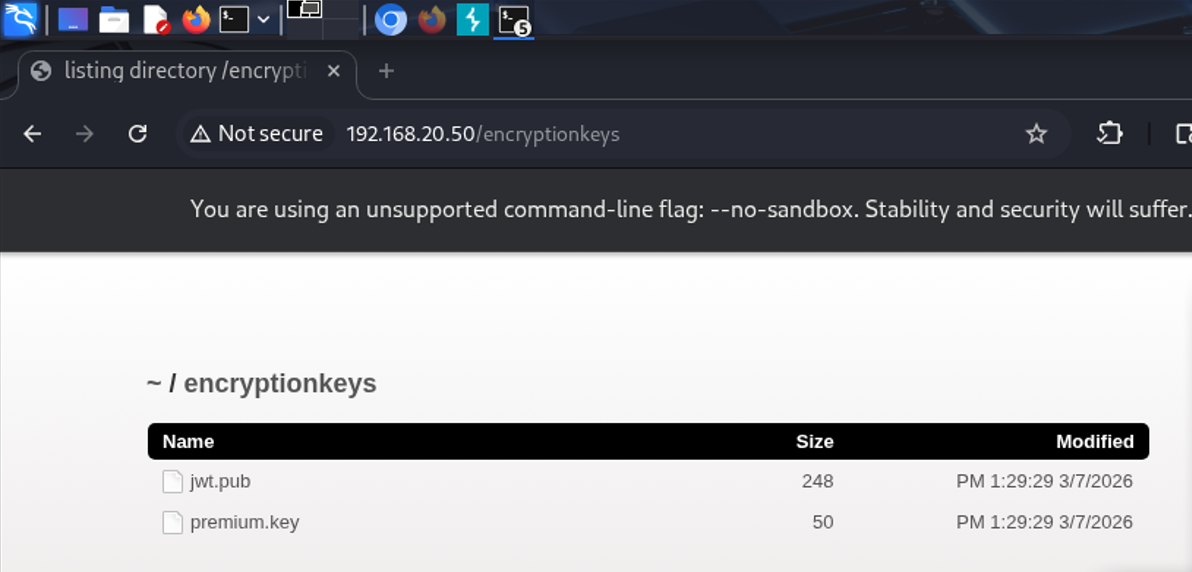
Upon visiting it, we see there’s two keys, one of which is an RSA Key. Exactly what we’re looking for. The other is for some other challenge.</p>
<p>Taking our cookie from earlier, I spent time modifying the fields in various ways, each time signing it with the RSA key we found:
<code>Jwt_tool.py &lt;token&gt; </code></p>
<p>
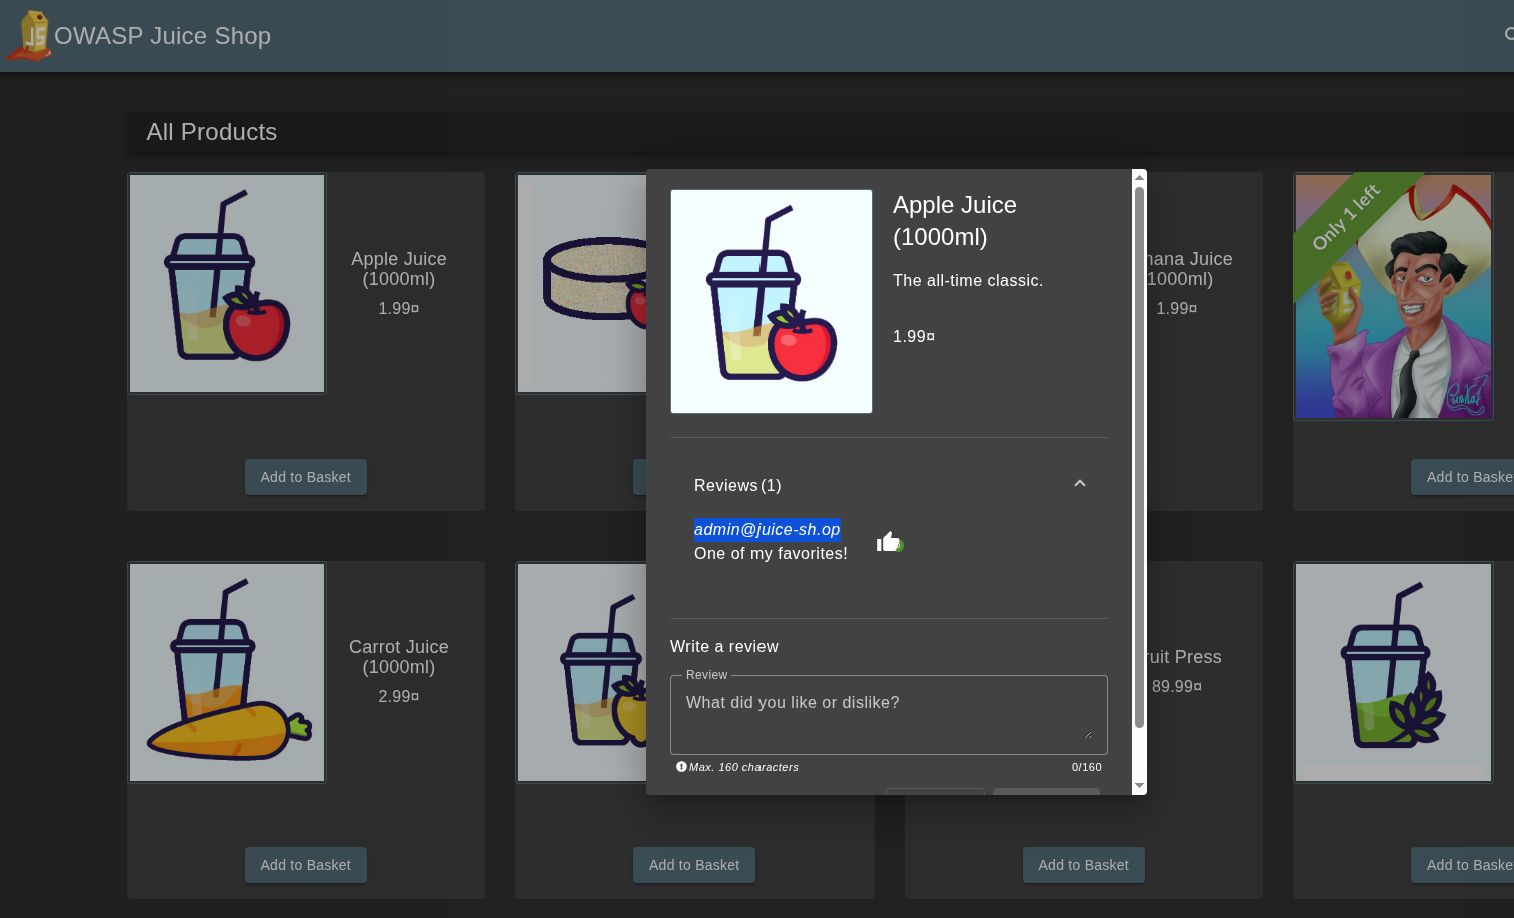
I started with changing ID to 1, and then role: admin, but figured maybe it authenticated based on email or username, so I went into recon to find the email, finding it quickly in a review: email: admin@juice-sh.op. I was guessing the username was probably admin.
Find admin email:</p>
<div class="image">
  <img src="/Assets/images/postimages/JWTHashConfusion/adminemail.png" alt="a review left by the admin reveals the email.">
  <figcaption>Yes, I'm aware there's writeups and I could just look up the email, but I'm pretending this is a blind test. At least for now... </figcaption>
</div>
<p>
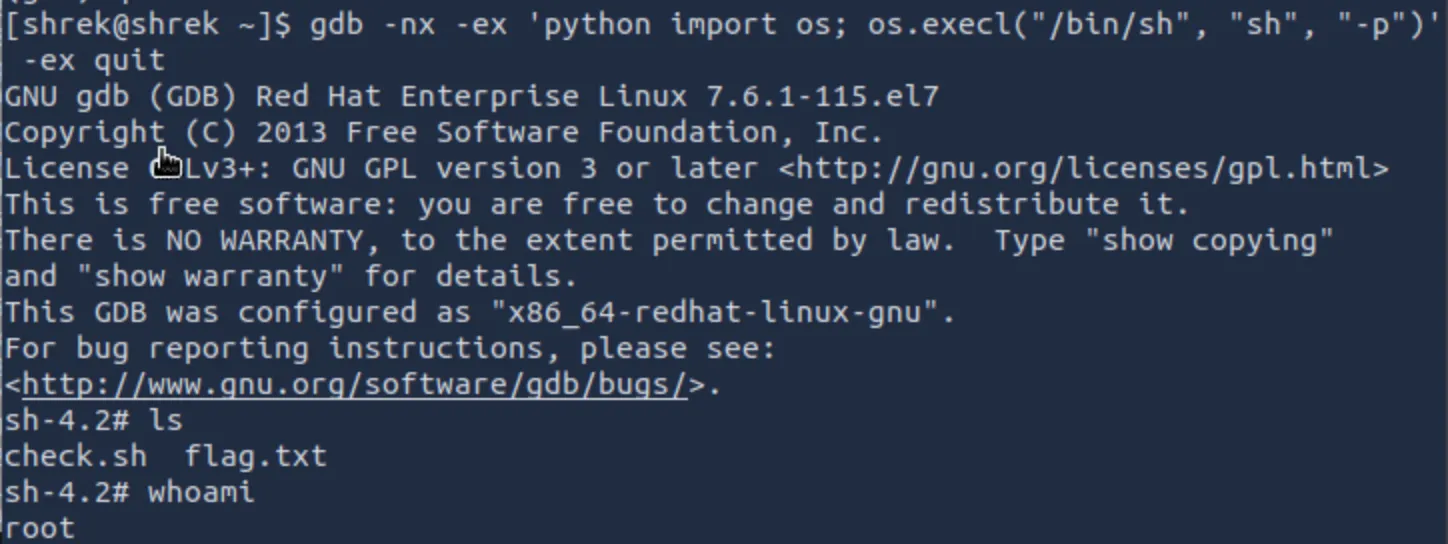
One problem I ran into while modifying values was that originally I had been appending new payload values instead of editing the data field values. Also, I had to make sure I was signing it each time. Unfortunately, even with all this trial and error, the fields didn't match the real admin token exactly. At this point, I used a SQLi in the admin field to reverse engineer what the real token looked like, because I spent a LOT of time trying to get the fields right.
Logged in with: <code>admin@juice-sh.op’-- </code> (comments out the password field) to find the token structure. No harm in saving some time as long as the fundamental attack works.</p>
<p>I spotted the difference! As expected, most of my values were correct, but the username was empty in the legitimate token, which is what was causing the token to fail.</p>
<p>Sidenote: Philosophically speaking, is it a “legitimate token” if it was issued by the server but obtained with an SQLi?</p>
<p>Anyways, I then logged out, cleared cookies, and re-signed the original testuser@bruh.com cookie (with modifications to the role, id, username, and email, before signing it with the public key). To my satisfaction, this worked!</p>
<div class="image">
  <img src="/Assets/images/postimages/JWTHashConfusion/POC.png" alt="Screenshot showing the cookie, as well as the header decoded with the admin user being logged in to demonstrate the success of the attack.">
  <figcaption>Authentication Bypassed, account taken over! </figcaption>
</div>
<p>
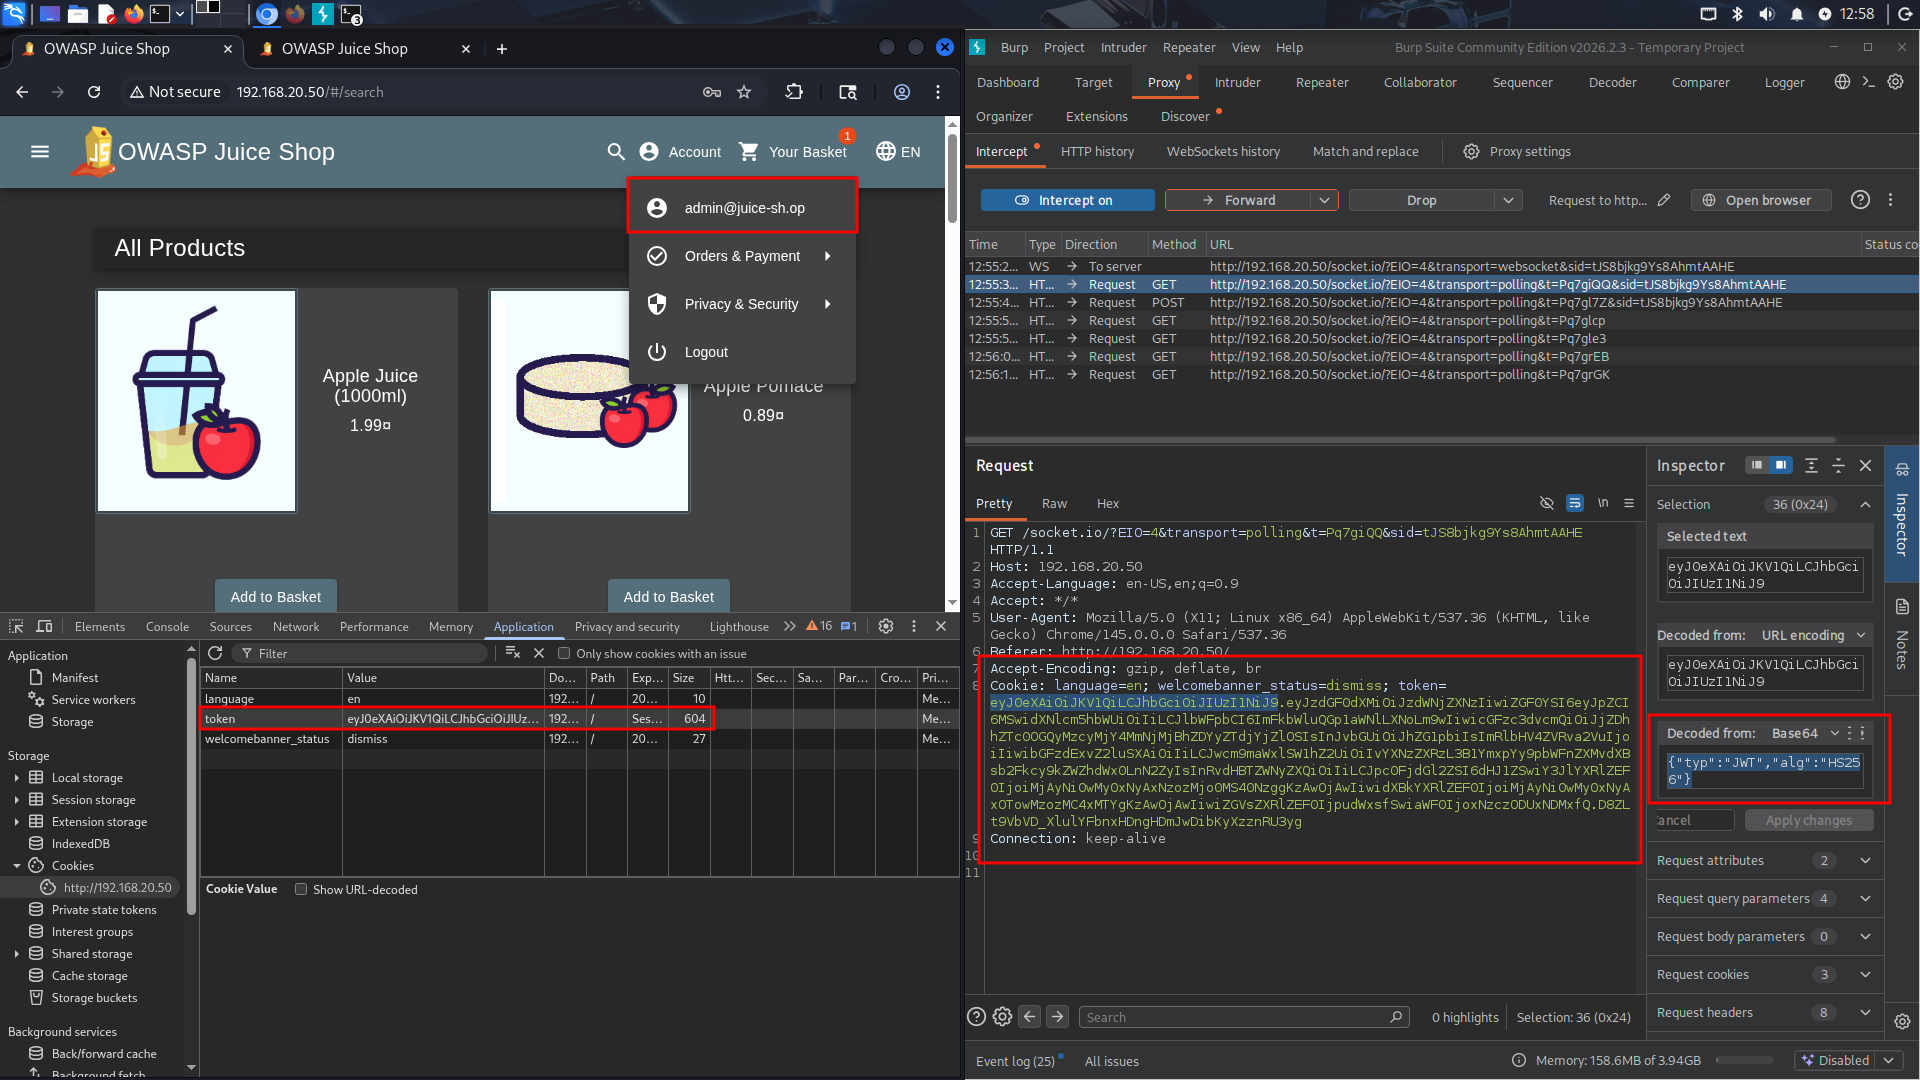
You can see it’s different from the original admin token, it’s now signed hs256 and with the public key, and also the md5 password hash and profile image are unchanged from the originally generated testuser@bruh.com cookie.</p>
<h3>Remediation:</h3>
<p>The easiest way to remediate against this attack is to not allow the ALG to be chosen dynamically from the token. If your application absolutely requires support for more than one type of algorithm, then at least use different keys.  For example in Hono’s remediation:
Before version 4.11.4, alg was optional, and was a trusted header:</p>
<pre><code class="language-import">
app.use(
  '/auth/*',
  jwk({
    jwks_uri: 'https://example.com/.well-known/jwks.json',
    // alg was optional
  })
)
</code></pre>
<p>Compared to their Patched configuration:</p>
<pre><code>import { jwk } from 'hono/jwk'

app.use(
  '/auth/*',
  jwk({
    jwks_uri: 'https://example.com/.well-known/jwks.json',
    alg: ['RS256'], // required: explicit asymmetric algorithm allowlist
  })
)

</code></pre>
<p>Source: https://github.com/honojs/hono/security/advisories/GHSA-3vhc-576x-3qv4</p>
<p>The good news and bad news: it was hard enough for me to directly replicate the fields for a valid token for a specific user in my manual testing. However, this absolutely does not mean that it’s not possible for more advanced attackers. It might take some API enumeration, or brute forcing, but a motivated attacker could definitely identify valid target accounts to forge tokens from. Strong cryptography is useless if you let the attacker define how it’s used. Thanks for reading! <span class="end-of-article">&lt;/&gt;</span></p>
<div class="references-box">
  <h3>References & Resources</h3>
  <ul>
  <li>cool @nahamsec video from about 8 months ago, talking about this same vulnerability class and how it landed him a 10k bug bounty: <a href="https://www.youtube.com/watch?v=0R3xHx7fPUM" target="_blank" rel="noopener noreferrer">https://www.youtube.com/watch?v=0R3xHx7fPUM</a></li>
<li>Critical Vulnerabilities in JSON Web Token Libraries (published by Tim McLean himself): <a href="https://auth0.com/blog/critical-vulnerabilities-in-json-web-token-libraries/" target="_blank" rel="noopener noreferrer">https://auth0.com/blog/critical-vulnerabilities-in-json-web-token-libraries/</a></li>
<li>UTCTF2026 Web Writeups (Not mine but for any CTF'ers out there): <a href="https://gist.github.com/Panya/ddec230a660f0327da4d8e8c3fda0153" target="_blank" rel="noopener noreferrer">https://gist.github.com/Panya/ddec230a660f0327da4d8e8c3fda0153</a></li>
<li>jwt_tool — JWT Testing Toolkit (GitHub): <a href="https://github.com/ticarpi/jwt_tool" target="_blank" rel="noopener noreferrer">https://github.com/ticarpi/jwt_tool</a></li>
<li>OWASP Juice Shop — (GitHub): <a href="https://github.com/juice-shop/juice-shop" target="_blank" rel="noopener noreferrer">https://github.com/juice-shop/juice-shop</a></li>
  </ul>
</div>

    ]]></content>
  </entry>
  <entry>
    <title>MS17-010 - Eternal Blue</title>
    <link href="https://saucedasecurity.com/posts/EternalBlue/"/>
    <updated>2026-03-11T00:00:00Z</updated>
    <id>https://saucedasecurity.com/posts/EternalBlue/</id>
    <content type="html"><![CDATA[
      <br>
<p><em>Note from the Author:</em> Welcome to the first post in my CVE of the week series! This post covers a brief overview of my findings while experimenting with the infamous EternalBlue Exploit. For a more in depth writeup of this CVE, including things like my specialized, EternalBlue-tuned sysmon config, SMB blocking Access Control List, and custom Splunk Dashboard created for this lab, check out my github: <em><a href="https://github.com/paperclipsvinny/cve-of-the-week">github.com/paperclipsvinny/cve-of-the-week</a></em></p>
<h2>Overview</h2>
<div class="image">
  <img src="/Assets/images/postimages/EternalBlue/wannacry.png" alt="Screenshot of a computer infected by WannaCry">
  <figcaption>This post would be remiss if it didn't include at least one screenshot from the WannaCry worm.
  <a href="https://en.wikipedia.org/wiki/File:Wana_Decrypt0r_screenshot.png">Source.</a></figcaption>
</div>
In 2017, a mysterious group called the shadow brokers claimed to have hacked the NSA, and leaked some of their developed cyber weapons as proof. EternalBlue was among the leaked, and it was confirmed that The NSA knew about the vulnerability for years and kept it secret for its own exploitation. When the NSA learned the tools might have been stolen, they warned Microsoft, who released patch MS17-010 on March 14th, 2017. However, many systems failed to install the patch, and in May of 2017, WannaCry, a worm built based on the EternalBlue exploit, was released in the wild. Within hours, it had infected hundreds of thousands of machines. Because of its significance and fascinating story, I chose EternalBlue (CVE-2017-0144) as my inaugural CVE in my new weekly series. 
<h3>Scope &amp; Authorization</h3>
<p>This testing was conducted on a Windows 7 system, operated offline, for educational and defensive security research purposes only. I conducted this testing ethically, with express authorization.</p>
<h3>At-A-Glance</h3>
<p><span class="label">CVE ID:</span> CVE-2017-0143 – CVE-2017-0148<br>
<span class="label">Alias:</span> MS17-010 – EternalBlue<br>
<span class="label">Disclosed:</span> March 14, 2017<br>
<span class="label">Severity:</span> 9.8 (Critical)<br>
<span class="label">Exploit Type:</span> RCE<br>
<span class="label">Software Affected:</span> Microsoft Windows operating systems using SMBv1:<br>
Windows 7, XP, Vista (SP2), 8, 8.1, 10 (prior to build 1703)<br>
Windows Server 2003, 2008, 2008 R2, 2012, 2012 R2, 2016 <br>
<span class="label">Notable Victims:</span><br>
<span class="label">Healthcare:</span> NHS (UK), Harapan Kita Hospital (Indonesia), Instituto Nacional de Salud (Colombia)<br>
<span class="label">Shipping:</span> Maersk, FedEx (TNT Express)<br>
<span class="label">Pharmaceutical:</span> Merck (MSD)<br>
<span class="label">Automotive:</span> Renault, Nissan, Honda</p>
<div class="image">
  <img src="/Assets/images/postimages/EternalBlue/EternalBlue Lab Setup.png" alt="Lab Network Diagram.">
  <figcaption>My network Topology for this specific Lab.</figcaption>
</div>
<h2>Typical Attack Chain</h2>
<p>Although the entire lab was set up by yours truly, here’s what I did in the attacker role:
Conduct Network Service Discovery to confirm the target was vulnerable, both using nmap scans, scripts, and the metasploit auxiliary/scanner/smb/smb_ms17_010 module.
Then, the next step was initial access- although scripts handled this, the basic bug logic is buffer overflow, where an attacker send a malformed SMB_COM_TRANSACTION2 packet where TotalDataCount exceeds DataCount, which is then allocated as a small buffer by the srv.sys driver, but copies data based on TotalDataCount, causing a buffer overflow. This enables the attacker to write past allocated memory into adjacent kernel structures. Without going into too much detail, the data written from the overflow corrupts an SRVNET_BUFFER_HDR structure which contains an Memory Descriptor List (MDL) pointer. The attacker then redirects that MDL pointer to the malicious shellcode, which is then executed in kernel mode upon processing of the next smb request. Then, the shellcode gets the payload running in user-mode with SYSTEM privileges. Once the attacker has a shell, it's just a matter of exfiltrating data, such as user hashes, etc, and whatever other actions the Attacker performs– lateral movement, obfuscation/ Anti-forensics, Denial of service, etc.</p>
<h2>Example Payloads</h2>
<div class="image">
  <img src="/Assets/images/postimages/EternalBlue/kernelcrash.png" alt="Kernel panic">
  <figcaption>The early Blue Screen Of Deaths - Highlighting the Kernel Crash Error I saw many, many times while fine tuning AutoBlue</figcaption>
</div>
<p>Payloads are truly where my lab got interesting. I originally wanted to try running the generic Metasploit EternalBlue payload against 3ndG4me’s AutoBlue script that allows further customization to write payloads that are stealthier, and then compare detections; however I could not get the AutoBlue script to reliably generate a shell without crashing the Kernel. The main issue I attribute that to was that it was incredibly hard finding the correct groom value, as well as the right named pipe (every time the Kernel crashed it caused the layouts to change). Groom connections are used to spray the kernel heap with controlled data, which is supposed to make memory layout predictable before triggering the overflow, but in my case was unreliable.</p>
<div class="image">
  <img src="/Assets/images/postimages/EternalBlue/metasploitgroomlogic.png" alt="the groom counter logic for metasploit's script.">
</div>
<p>After inspecting the Metasploit script, it was clear that Metasploit was relying on smart guessing and luck- starting with an initial grooming count, and then incrementally trying different groom count values, each time increasing by 1, which is a similar tactic that I attempted, but I was not able to successfully get a shell. A lot of the time it would simply fail to connect, despite networking being configured. I suspect it might be due to Python/Impacket version incompatibilities, which I also experimented with, but eventually decided to accept that public exploit code often requires specific environments to function, and can be finicky. At least experimenting with compiling custom shellcode taught me some new things.</p>
<p>I then pivoted to attempting the same stealth techniques in Metasploit– mainly, process injection into wmiprvse.exe to hide the LSASS access, and setting the exit behavior to kill just the thread, rather than the whole process. I chose wmiprvse.exe after checking some logs generated by legitimate behavior, and realized it would be very hard to write a detection rule that doesn’t false positive on the WMI provider host (wmiprvse.exe)’s legitimate LSASS access. However, ironically, a weird quirk with PrependMigrate + EternalBlue — caused the metasploit exploit to fire multiple times and each one opened a session. Which made the stealthier attack LESS sneaky (although with subsequent testing I was not able to reproduce this error).</p>
<div class="image">
  <img src="/Assets/images/postimages/EternalBlue/ManyMeterpreterSessions.png" alt="44 meterpreter sessions opened right after each other.">
  <figcaption>Is there such a thing as too many Meterpreter sessions?</figcaption>
</div>
<div class="image">
  <img src="/Assets/images/postimages/EternalBlue/Litt Up.png" alt="Splunk caught all of these processes.">
  <figcaption>And the other question: you don't think 44 meterpreter sessions will blow my cover, right?</figcaption>
</div>
As stated though, some interesting findings was that metasploit’s default eternalblue payload is actually decently advanced, it uses reflective DLL injection and blends in with regular processes well:
<div class="image">
  <img src="/Assets/images/postimages/EternalBlue/stealthier.png" alt="Screenshot showing smaller Splunk footprint">
  <figcaption>Definitely much harder to spot the irregularities. </figcaption>
</div>
<h2>Remediation</h2>
<p>The easiest way to stop Eternal Blue from spreading is to patch your systems! Update to the latest version of Windows, etc. However, for the sake of this lab, I also created an access control list on my cyber range that completely shut down the exploit. The Access Control list basically blocks common SMB/NetBIOS ports such as 445, 138,139, etc. and logs any packets that match that rule, inbound on FastEthernet0/0.</p>
<p>If you want to know more about the configuration of my air gapped cyber range, check out <a href="https://saucedasecurity.com/projects/cyber-range/">this article on its creation</a>.</p>
<p>Overall, this lab gave me valuable insight into how kernel and system processes operate, as well as how advanced evasion techniques can be used to avoid detection. Stay tuned for next week’s CVE! <span class="end-of-article">&lt;/&gt;</span></p>
<div class="references-box">
  <h3>References & Resources</h3>
  <ul>
  <li>SentinelOne — EternalBlue NSA-Developed Exploit Analysis: <a href="https://www.sentinelone.com/blog/eternalblue-nsa-developed-exploit-just-wont-die/" target="_blank" rel="noopener noreferrer">https://www.sentinelone.com/blog/eternalblue-nsa-developed-exploit-just-wont-die/</a></li>
<li>MITRE ATT&CK — Credential Dumping (T1003): <a href="https://attack.mitre.org/techniques/T1003/" target="_blank" rel="noopener noreferrer">https://attack.mitre.org/techniques/T1003/</a></li>
<li>MITRE ATT&CK — Exploitation of Remote Services (T1210): <a href="https://attack.mitre.org/techniques/T1210/" target="_blank" rel="noopener noreferrer">https://attack.mitre.org/techniques/T1210/</a></li>
<li>MITRE ATT&CK — Lateral Tool Transfer (T1570): <a href="https://attack.mitre.org/techniques/T1570/" target="_blank" rel="noopener noreferrer">https://attack.mitre.org/techniques/T1570/</a></li>
<li>Microsoft — Sysmon (System Monitor) Download: <a href="https://www.microsoft.com/en-us/download/details.aspx?id=46148" target="_blank" rel="noopener noreferrer">https://www.microsoft.com/en-us/download/details.aspx?id=46148</a></li>
<li>SwiftOnSecurity — Sysmon Configuration (GitHub): <a href="https://github.com/SwiftOnSecurity/sysmon-config" target="_blank" rel="noopener noreferrer">https://github.com/SwiftOnSecurity/sysmon-config</a></li>
  <li>Twingate — Reflective DLL Injection Glossary: <a href="https://www.twingate.com/blog/glossary/reflective%20dll%20injection" target="_blank" rel="noopener noreferrer">https://www.twingate.com/blog/glossary/reflective%20dll%20injection</a></li>
  </ul>
</div>

    ]]></content>
  </entry>
  <entry>
    <title>Physical Cyber Range</title>
    <link href="https://saucedasecurity.com/projects/cyber-range/"/>
    <updated>2026-02-26T00:00:00Z</updated>
    <id>https://saucedasecurity.com/projects/cyber-range/</id>
    <content type="html"><![CDATA[
      <p>An overview of how and why I built my cyber range— an isolated lab environment for practicing both offensive and defensive security techniques. This article is an overview; there's a more in-depth writeup linked at the end.</p>
<div class="image">
  <img src="/Assets/images/projectimages/CyberRange/IMG_3845.jpg" alt="Picture of my Range's switch and router" />
  <figcaption>
    "Like any good hacker, I have a lot of stickers at my disposal. However, this "built to breach" sticker fits so perfectly here, it couldn't have been anything else." 
  </figcaption>
</div>
<h2>Why I built this project:</h2>
<p>I built this cyber range because I needed a place where I could safely build my own labs and experiment freely with a high level of customization over the setup. I wanted a learning resource that lacked a 'step by step' structure– the type typically found on TryHackMe or similar training environments. Online programs like that are great for fundamentals, but in my opinion, if you have to build everything yourself in order to break it, you'll learn a lot more overall.</p>
<p>I also wanted to start developing a more enterprise-style attack methodology, and the best way to do that is to actually build an enterprise-style network. So that's what I did.</p>
<p><strong>Virtual vs physical:</strong> While a lot of cyber ranges are hosted within the cloud, I had some legacy Cisco hardware given to me by my networking professor, and while it's quite old, the hardware still works perfectly. Additionally, having an airgapped and isolated testing network gives me peace of mind that whatever I throw at it will stay isolated. For those two reasons, I went with a physical setup for this cyber range.</p>
<p>The largest goal I had for myself while building this lab was to design it to support future learning projects, whether that's WGU coursework, studying for exams, training for CTFs, practicing Active Directory attacks, or anything else that catches my curiosity. Having a modular framework that I can build upon and reshape to fit my needs is ideal for where I am in my learning journey.</p>
<h2>High-Level Architecture</h2>
<p>Within my Cyber Range's topology, there are three security zones:</p>
<ul>
<li>Internal LAN (targets)</li>
<li>Attacker network</li>
<li>Monitoring/SIEM network</li>
</ul>
<div class="image">
  <img src="/Assets/images/projectimages/CyberRange/CyberRangeTopology.png" alt="A diagram of my Range's network topology." />
</div>
<p>Inter-VLAN routing is handled router-on-a-stick style, with Fa0/1 carrying the trunk link to the switch. The attacker RPi is technically on a dedicated router interface (Fa0/0), but it's still assigned to VLAN 10 to keep the zones consistently isolated.</p>
<h2>Hardware &amp; Platform Choices</h2>
<p>This entire range was built without spending any money– I had some Raspberry Pis (RPis) laying around that I'd gotten for free, along with gifted Cisco hardware and Ethernet cables I made myself (using my friend's cable-making supplies). For this project, RPis are perfect for attacker/target roles because of their low energy cost and low power.</p>
<p>As for the networking gear, I have a Cisco Catalyst Layer 2 switch (2950) and accompanying Cisco 2600 series router for enterprise realism. Also, Splunk Enterprise is the SIEM platform I chose, mainly because it's commonly found in enterprise environments.</p>
<h2>Network Segmentation &amp; Routing Strategy</h2>
<p>For the range's routing strategy, I sought VLAN-based segmentation to isolate roles cleanly. Because the router only has two interfaces, a trunk link to the switch was necessary to support multi-VLAN routing for the number of devices I wanted to deploy. I have done many of these configurations in Cisco Packet Tracer when I took Rick Graziani's CIS 83 – <em>Enterprise Networking</em> at Cabrillo, but it felt satisfying to revisit those concepts on real hardware. I rarely get the chance to use Cisco IOS commands and brush up on specific things like how 802.1q tags are configured, so this project was the perfect thing to keep those things fresh in my mind.</p>
<h2>Attacker &amp; Target Setup</h2>
<p>For the attacker and target operating systems, I chose Kali and Ubuntu. While Kali can feel bloated for researchers who've narrowed down their own specific toolset, it's the standard all-in-one for a reason– it's an all-in-one, and for a lab like this, where I intend to practice many different types of attacks, it makes a lot of sense.</p>
<p>For the vulnerable target, I went with Ubuntu-based for two reasons- firstly: it's widely used in server environments, and secondly: it's quite lightweight. This is especially true when running without a desktop environment, like the one on my range is. Both of these reasons make Ubuntu LTS a great choice for the RPi 3A+.</p>
<p>One thing I didn't expect to spend much time on was password recovery. I kept getting locked out, which meant rolling up my sleeves and getting into the weeds with bootloader manipulation and digging into Linux internals. Whilst annoying in the moment, it's genuinely useful to learn more about, and again– this is the kind of knowledge that you're not going to get unless you go through it first-hand.</p>
<h2>Defensive Monitoring Design (SIEM VLAN)</h2>
<p>The choice to have a dedicated monitoring VLAN to mirror a real SOC environment was easy. Logs are forwarded from the targets to the SIEM, and the network separation helps prevent an attacker from tampering with them– although that's exactly the kind of thing I plan to study extensively with this setup…eventually.</p>
<h2>The Splunk-on-ARM Reality Check</h2>
<p>I had originally planned to run Splunk on an RPI 4B with 8GB of RAM, which I initially reasoned was sufficient for a small lab with minimal traffic. However, the real bottleneck was the CPU emulation that made instructions run quite slowly. I spent a lot of time trying to get it to work with QEMU and Docker for AMD64 emulation, but eventually decided it would be better to pivot by moving the SIEM to dedicated hardware– my old OptiPlex (running Windows 10). The shift to start fresh on the install on a different machine was the right move, and I was able to get Splunk running much quicker. Sometimes it's faster to cut your losses and realize when something's not working, rather than keep fighting it.</p>
<h2>Future-facing value</h2>
<div class="image">
  <img src="/Assets/images/projectimages/CyberRange/IMG_3835.jpg" alt="Picture of my desk setup. " />
  <figcaption>
    "At my desk, I now have a complete hacker's playground- attacker, defender, and dection to boot!" 
  </figcaption>
</div>
<p>This project is nowhere near done. My next step is starting a weekly CVE series– taking a vulnerability, replicating it in the lab, and writing it up; a series that will push me to learn various types of attacks in depth. Beyond that, this range opens a lot of doors: lateral network movements, detection and alert tuning, etc. I definitely plan to study Active Directory attack techniques as well, including but not limited to: Pass-the-Hash, DCSync, and Kerberoasting. In the future, I also would like to challenge myself to set up monitoring thoroughly, and then do a full black-box engagement against a target I know nothing about on the target network. Perhaps this takes the form of a VulnHub machine, or something that gets randomly provisioned without me seeing the setup. Then, I'd like to see how efficient my monitoring/hardening was. Either way, I'm excited to continue training myself to think like a real red team adversary. <span class="end-of-article">&lt;/&gt;</span></p>
<p><em>As promised, if you'd like to see my technical notes and an in-depth write-up from the process of creating this lab, check out this GitHub repo: <a href="https://github.com/paperclipsvinny/physical-cyber-range">https://github.com/paperclipsvinny/physical-cyber-range</a>. This is also where future updates to the cyber range configuration will be posted.</em></p>
<div class="image">
  <img src="/Assets/images/projectimages/CyberRange/ricedoutcybersecurityrange.png" alt="Top view of cyber range " />
  <figcaption>
    "You made it to the end of the post! Here's some #hackerz stickers as a reward." 
  </figcaption>
</div>

    ]]></content>
  </entry>
  <entry>
    <title>Linksys E5350 Router Hacking</title>
    <link href="https://saucedasecurity.com/projects/routerhacking/"/>
    <updated>2026-02-18T00:00:00Z</updated>
    <id>https://saucedasecurity.com/projects/routerhacking/</id>
    <content type="html"><![CDATA[
      <div class="image">
  <img src="/Assets/images/projectimages/LinksysE5350/dnsconf.png" alt="Picture of DNS configuration change from within the router." />
  <figcaption>DNS Hijacking is just scratching the surface of the potential for attacks when you can modify any files on a router.</figcaption>
</div>
<h2>Overview</h2>
<p>This project started while I was trying to add a new wireless addition to my cyber range. While attempting to flash OpenWRT on a random router that I had laying around, I realized I would have to go a step deeper than the traditional firmware upload web endpoint found on some other Linksys routers. For my particular model, the Linksys E5350, there was no such option.</p>
<h2>Tools Used</h2>
<h3>Hardware</h3>
<ul>
<li>USB-to-serial cable</li>
<li>Serial cable to FTDI board</li>
<li>Jumper wires</li>
<li>Multimeter</li>
<li>Ethernet cable (for connecting the router and my PC through a local area network)</li>
</ul>
<h3>Software</h3>
<ul>
<li>PuTTY</li>
<li>TFTPD64 Server</li>
<li>OpenWRT</li>
<li>Hashcat</li>
</ul>
<h2>What Is UART?</h2>
<p>Universal Asynchronous Receiver-Transmitter, or UART, is a hardware communication protocol that enables two devices to send and receive data bit-by-bit over two wires: transmit and receive (TX and RX). UART also relies on a shared ground (GND), and occasionally VCC, which provides power.</p>
<p>The asynchronous nature of UART means that devices do not need to share a clock signal. Instead, both sides agree on a communication speed known as the baud rate. This makes UART especially useful for debugging embedded systems, since components such as a microcontroller and sensor can easily communicate, for example.</p>
<p>Oftentimes, UART interfaces are left unsecured on production boards and provide high levels of access. Because UART grants such powerful privileges, manufacturers may remove pin headers or labels to obscure the interface, however with basic hardware knowledge and a multimeter, these pins can usually still be identified. Once connected, UART access often provides the keys to the kingdom in terms of firmware and system internals.</p>
<h2>Device Teardown + UART Identification</h2>
<p>I began by opening the router and visually inspecting the printed circuit board (PCB) to locate potential UART headers. Typically, UART pins appear as a group of three or four pins aligned in a straight line. After opening the router (which was a challenge on its own), I identified two possible UART locations.</p>
<div class="image">
  <img src="/Assets/images/projectimages/LinksysE5350/uartlocations.png" alt="Picture of the Router's internal PCB with two pin headers on either side of the board." />
</div>
<p>As expected, there were no silkscreen labels, so I used a multimeter to identify the pins. I started by searching for a ground pin using continuity mode.</p>
<div class="image">
  <img src="/Assets/images/projectimages/LinksysE5350/multimeter.jpg" alt="Picture of my trusty Multimeter set to continuity mode." />
</div>
<p>With the black probe placed on a known metal contact point, I tested each pin, starting with the left. The left header showed no ground connection, but the right header did. My readings were as follows:</p>
<ol>
<li>Reading on: 1 / Reading off: 571</li>
<li>Reading on: 1 / Reading off: 1216</li>
<li>Reading on: 1007 (most likely TX) / Reading off: 873</li>
<li>Not connected (NC) — reading 1 both on and off</li>
<li>Ground — continuity test beeps (measured ~1 while off)</li>
</ol>
<p>These values vary because the router actively drives voltage across TX and RX lines, causing the multimeter to display different impedance values.</p>
<h2>Serial Access</h2>
<p>With the likely TX/RX pins identified (Pins 1-3 were the likely suspects), all I needed to do was a bit of trial and error with my serial monitor running to determine which was which.</p>
<p>To accomplish this, I launched PuTTY and selected the correct COM port (COM4 in my case). As for Baud rate, one of the most common default rates for UART communication is 115200, so I started PuTTY there. I also double checked that my FTDI adapter's voltage selection jumper was configured for 3.3V as opposed to 5V, which could potentially damage the router.</p>
<p>After a switch or two, Readable output confirmed the correct configuration. TX and RX corresponded to pins 2 and 3, respectively.</p>
<p>The final setup followed this chain:</p>
<p>USB → Serial → FTDI → UART</p>
<div class="image">
  <img src="/Assets/images/projectimages/LinksysE5350/ftdiconnections.png" alt="Picture of open router." />
</div>
<p>Above is the hacking setup. Using electrical tape to hold the pins in place helped a lot, because even the smallest movements could push them out of contact with the pinouts, and I wanted to avoid soldering them on.</p>
<p>Once connected, I interrupted the boot process using <code>Ctrl + C</code>. After boot completion, the system displayed a <code>#</code> shell prompt.</p>
<h2>Privilege Confirmation</h2>
<p>To confirm root access, I first attempted to run <code>whoami</code>. This command failed, but not due to a lack of system privileges, but rather on account of the shell environment being BusyBox. BusyBox, AKA the: ‘Swiss Army Knife’ of Embedded Linux, has earned that title because, depending on build configuration, BusyBox contains anywhere from dozens to hundreds of UNIX/Linux commands, all packed into one small executable file. This  compactness makes it extremely common to find on a lot of low level IoT devices such as this Linksys E5350 router. While hundreds of commands might sound like a lot, in reality it’s quite stripped down compared to the commands typically available in a full Linux environment. For example, in this BusyBox ash, both <code>whoami</code> and <code>id</code> were unavailable. The third try is the charm, though:</p>
<div class="image">
  <img src="/Assets/images/projectimages/LinksysE5350/rootconfirmation.png" alt="A screenshot from the output of running cat /etc/passwd. " />
</div>
<pre><code class="language-sh">cat /etc/passwd
</code></pre>
<p>Success! The shell confirmed the presence of the root user by displaying that our user belongs to 0:0, or UID 0 and GID 0 (granting all privileges). Another confirmation is that we can see the root password hash (which is DES, based on the character length of 13, and it’s quite outdated).  Now, before experimenting further, I had to make sure I backed up the firmware, to minimize the risk of accidentally bricking the device.</p>
<h2>Firmware Backup</h2>
<p>This is where TFTPD64 comes into play. I configured TFTPD64 as a TFTP server using a directory named <code>/openwrt/</code>. After verifying firewall and network connectivity settings, I connected the router to my PC via Ethernet and rebooted it.</p>
<p>To verify network configuration on the router:</p>
<pre><code class="language-sh">ifconfig
</code></pre>
<p>From my PC:</p>
<pre><code class="language-sh">ping 192.168.1.10
</code></pre>
<p>The ping was sucessful, and everything was lined up, so it was time to proceed.
The first thing is to back up the router’s flash layout, available at /proc/mtd:</p>
<pre><code class="language-sh">cat /proc/mtd
</code></pre>
<p>I then created a temporary backup directory in RAM, which would be where I could send the files out of:</p>
<pre><code class="language-sh">mkdir /tmp/backup
</code></pre>
<p>Using <code>dd</code>, which is a tool for copying raw bytes, I copied each file one at a time (but from the bootloader region of flash, thus /dev/mtdX) into the temporary directory at /tmp/backup, and confirmed they were there:</p>
<pre><code class="language-sh">dd if=/dev/mtd1 of=/tmp/backup/mtd1_bootloader.bin
dd if=/dev/mtd2 of=/tmp/backup/mtd2_config.bin
dd if=/dev/mtd3 of=/tmp/backup/mtd3_factory.bin
dd if=/dev/mtd4 of=/tmp/backup/mtd4_kernel.bin
</code></pre>
<p>Then, from /tmp/backup, I ran these commands to push the backup files onto the TFTP server:</p>
<pre><code class="language-sh">tftp -p -l mtd1_bootloader.bin 192.168.1.2
tftp -p -l mtd2_config.bin 192.168.1.2
tftp -p -l mtd3_factory.bin 192.168.1.2
tftp -p -l mtd4_kernel.bin 192.168.1.2
</code></pre>
<p>On the TFTPD64 server, I could see the files were writing successfully:</p>
<div class="image">
  <img src="/Assets/images/projectimages/LinksysE5350/tftpd64server.png" alt="Picture of the TFTPD64 server confirming data being written to it." />
</div>
<p>Now that I had a backup of the router’s flash chip, I could recover from bricking the router by restoring its factory settings. That means, if I accidentally flashed OpenWRT to the wrong partition, I can breathe freely, because it’s recoverable. I was free to mess to my heart’s content on the router.</p>
<h2>DNS Hijacking</h2>
<p>My findings indicate multiple critical vulnerabilities- a direct, unauthenticated root shell on boot,
Which allows an attacker to extract sensitive data such as network passwords, connected device information, and even modify configurations. To demonstrate the damage an attacker could do, I will be finding and changing the DNS configuration on the router.
First, running <code>ps | grep dns</code> to list any processes with dns running:</p>
<div class="image">
  <img src="/Assets/images/projectimages/LinksysE5350/psgrepdns.png" alt="Picture of the output of ps | grep" />
</div>
<p>Then, <code>find / -name &quot;*dnsmasq*&quot; 2&gt;/dev/null</code>, which leads to:</p>
<pre><code class="language-sh">var/run/dnsmasq.pid
/etc/dnsmaq.conf
/bin/dnsmasq
</code></pre>
<p>If we open the config file:</p>
<pre><code class="language-sh">cat /etc/dnsmasq.conf
</code></pre>
<div class="image">
  <img src="/Assets/images/projectimages/LinksysE5350/dnsconf.png" alt="Picture of the output of cat /etc/dnsmasq.conf" />
</div>
<p>Now, any settings can be changed, and to demonstrate impact– we can choose to exchange our own, malicious DNS server to this configuration for the one currently found in the file:</p>
<pre><code class="language-sh">{
echo &quot;# Attacker DNS Server&quot; 
echo &quot;dhcp-option=6,192.168.1.100&quot;
} &gt; /etc/dnsmasq.conf
</code></pre>
<p>In the command above, DHCP-option 6 tells clients to now use 192.168.1.100 as their DNS server, meaning whoever controls the 192.168.1.100 server can run phishing attacks by redirecting any sites the clients look up, perform data exfiltration by intercepting traffic, or even malware distribution via fake update servers.</p>
<p>However, if done correctly, this attack can be made much harder to detect, by minimizing the amount of DNS Queries the attacker's server has to handle. By just changing certain addresses, you can make only some websites redirect to a fake website in the user’s browser. In the example below, I demonstrate this with &quot;bankofamerica.com&quot;. With enough effort, an attacker could directly replicate the real website, so the user wouldn’t be able to tell the difference, and capture the user’s credentials in order to use them later to steal funds from the user’s bank account.</p>
<pre><code class="language-sh">{
  echo &quot;# Discreet Attack&quot;
  echo &quot;address=/bankofamerica.com/192.168.1.100&quot;
} &gt;&gt; /etc/dnsmasq.conf
</code></pre>
<p>The above scenario could happen with email logins, banking sites, really anything the user looks at online. In the example above, the DNS configuration file found at <code>/etc/dnsmasq.conf</code> is only served in RAM, meaning changes made to the file are not persistent. However, with knowledge gained from dumping the flash partitions from earlier (<code>/proc/mtd/</code>), we know that we can make persistence changes in <code>mtd2:config</code>, but I will not be demonstrating that in this article. The purpose of this DNS Hijacking segment is just to showcase potential impact, not act as a guide for anyone to follow (although again, a dedicated attacker could easily figure it out).</p>
<h2>Other Security Notes</h2>
<p>Additionally, the router’s password storage is unsafe- DES hashes are weak and crackable. With brute forcing, a technique that runs through every possible combination, and DES’s maximum password length of eight characters, it’s not a matter of if, but when, the password is recovered. Furthermore, with additional techniques (like the one I try below to run, called a dictionary attack), or rainbow tables (which use tables of precomputed hashes), this password can be cracked in an even shorter time. Since I already have root, as an attacker, there is no real need to crack this password, however it’s a good opportunity to practice my wordlist creation skills. First though, let’s start with the classic, quintessential weak password wordlist: (rockyou.txt).</p>
<h3>What is Rockyou.txt?</h3>
<p>RockYou was a company that got hacked back in 2009, and famously kept all their users’ passwords stored in unencrypted plaintext. The wordlist rockyou.txt, containing millions (32 million to be exact) of real users' passwords was compiled from that breach, and from that list, 14 million unique passwords were released as a result. If you’d like to hear more about that story, check out the sources box at the end of the article for a link to Episode 33 of Jack Rhysider’s podcast, Darknet Diaries, which goes into more depth.</p>
<h2>Attempting to crack the hash</h2>
<p>Anyways, I use Hashcat to try a dictionary attack against this hash.</p>
<pre><code class="language-sh">hashcat.exe -m 1500 -a 0 yBcAWtttzhkQ2 C:\Users\Vinny\Downloads\rockyou.txt
</code></pre>
<p>The -m is which type of hash, in this case 1500 for DES, and -a is for the attack mode, with 0 being Dictionary.</p>
<div class="image">
  <img src="/Assets/images/projectimages/LinksysE5350/rejectedhashes.png" alt="Picture of the output of the first hashcat pass with the RockYou.txt wordlist." />
</div>
<p>The first pass failed (which means we get to break out some fun rule sets), but it only took 19 seconds for an integrated GPU to try all 14 million passwords in that list (interestingly, Hashcat rejected 46% of passwords in rockyou.txt because they exceeded DES's 8-character maximum length). Before going further, I decided to try bruteforcing all lowercase numbers, to see if it was some kind of numeric password, which was also exhausted without finding a match. Next, I attempted to create a specialized wordlist, using some information from the device, including MAC Address, Default SSID, and Default SSID Password. None of those worked, so I added some rules– appending numbers at the end, reversing the passwords, uppercasing all passwords, Toggling the position of each uppercase at position 0 (example: password → Password), appending common letters, leet speak (for example, password → p4ssw0rd), and even rotations/shifts of letters, etc, giving me thousands of variations of each one of these original dozen password ideas based on device info. Also, looking around on the inside of the router, I discovered a manufacturer sticker placed on the PCB, which I was certain would contain the password, but alas, nothing on that sticker worked either, even with rule sets added.</p>
<p>Since dictionary attacks and light brute forcing failed, I need to change tactics. The password is likely a random value or date; after exhausting millions of common passwords, all numeric combinations, and over 100,000 permutations of device-specific intelligence, it’s clear that finding it without deep brute forcing is unlikely. While my PC hardware isn’t well-suited for sustained brute-force attacks, it’s entirely realistic for attackers to use specialized hardware. Additionally, readily available cloud resources make it so that password-cracking rigs, capable of quickly defeating this password, are extremely accessible.</p>
<p>That’s the direction I plan to take this project next: with conventional approaches exhausted, the logical next step is to hand it off to my cloud-based password cracking setup, which I’ll cover in a future writeup. This portfolio isn’t meant to showcase only successful outcomes, but also my methodology when things don’t work- hence the inclusion of my documented password-cracking attempts on this project.</p>
<h2>Impact - Let the truth be told:</h2>
<p>Regardless of cracking the password, being able to obtain unauthenticated root privileges on this router is a vulnerability that can lead to an attacker reading and modifying any files- firmware and configurations, potentially serving as an attack vector for someone to use this device to move laterally onto other devices on your network. While this is a real security vulnerability, the exploitability risk factor is low. This vulnerability requires physical interaction with the router, and the risk that a malicious hacker is going to break into someone’s house or business, just to spend 20 minutes breaking open the router and interfacing with it via UART, in order to elevate their attack to some other target, is frankly quite unlikely. It’s more plausible that an attacker could purchase and compromise this device, install a Rootkit to have persistent access, and then pass the router off to their target to use unknowingly. However, that scenario is also improbable. While not a remotely exploitable vulnerability, this project demonstrates systemic IoT security failures that merit a writeup– also, this was a fun lab and it gave me more experience with IoT hacking.</p>
<p>These shortcomings can be used as teaching moments- especially to showcase how weak the principle of security through obscurity (leaving UART exposed but ‘hidden’) can be. UART Debug interfaces persist in production with no authentication, and Physical security is consistently undervalued. Just because a router has no visible screws, does not mean an attacker cannot open the plastic clips.</p>
<p>Lastly, I would like to highlight that these findings represent industry-wide IoT security problems, not just a single device flaw in a random Linksys router. I would like to continue my research on other routers and devices, and eventually showcase and develop other attacks, besides DNS Hijacking, from within my cyber range.</p>
<p>Also, as promised, in Part 2 of this router hacking series, I will document building an automated cloud GPU rig to finish cracking the password. Stay tuned! <span class="end-of-article">&lt;/&gt;</span></p>
<div class="references-box">
  <h3>Sources & References</h3>
  <ul>
    <li>TFTPD64: <a href="https://pjo2.github.io/tftpd64/" target="_blank" rel="noopener noreferrer">https://pjo2.github.io/tftpd64/</a></li>
    <li>PuTTY: <a href="https://www.chiark.greenend.org.uk/~sgtatham/putty/" target="_blank" rel="noopener noreferrer">https://www.chiark.greenend.org.uk/~sgtatham/putty/</a></li>
    <li>Wikipedia — Data Encryption Standard: <a href="https://en.wikipedia.org/wiki/Data_Encryption_Standard" target="_blank" rel="noopener noreferrer">https://en.wikipedia.org/wiki/Data_Encryption_Standard</a></li>
    <li>OpenWRT: <a href="https://openwrt.org/" target="_blank" rel="noopener noreferrer">https://openwrt.org/</a></li>
    <li>Hashcat: <a href="https://hashcat.net/hashcat/" target="_blank" rel="noopener noreferrer">https://hashcat.net/hashcat/</a></li>
    <li>RockYou wordlist (GitHub): <a href="https://github.com/brannondorsey/naive-hashcat/releases/download/data/rockyou.txt" target="_blank" rel="noopener noreferrer">https://github.com/brannondorsey/naive-hashcat/releases/download/data/rockyou.txt</a></li>
    <li>Darknet Diaries — Episode 33: <a href="https://darknetdiaries.com/episode/33/" target="_blank" rel="noopener noreferrer">https://darknetdiaries.com/episode/33/</a></li>
  </ul>
</div>
    ]]></content>
  </entry>
  <entry>
    <title>The Making of the Logo</title>
    <link href="https://saucedasecurity.com/posts/makingofthelogo/"/>
    <updated>2026-02-13T00:00:00Z</updated>
    <id>https://saucedasecurity.com/posts/makingofthelogo/</id>
    <content type="html"><![CDATA[
      <div class="image">
  <img src="/Assets/images/postimages/makingofthelogo/earlyversion.png" alt="An early version of my Logo.">
  <figcaption>An early version of the logo.</figcaption>
</div>
<h2>Inspiration</h2>
<p>This logo was one of my first projects using vector art, and I wanted it to carry real meaning. It was inspired by the ShellSharks logo by Mike Sass, which balances complexity and a clean aesthetic exceptionally well. His design is detailed and symbolic, yet still cohesive, plus every time you look at it, you notice something new. I admired that level of thoughtfulness and depth and aimed to achieve something similar in my own way.</p>
<p>Specifically, from Mike’s logo, his Yggdrasil (Tree of Life) concept– structured around the Cyber Kill Chain– stuck with me. I loved the idea of a central framework connecting different domains, but I wanted my version to reflect the specific areas of cybersecurity that interest me most.</p>
<div class="image">
  <img src="/Assets/images/postimages/makingofthelogo/shellsharks.png" alt="ShellShark's Logo.">
  <figcaption>Source: <a href="https://shellsharks.com/assets/img/avatar.png">https://shellsharks.com/assets/img/avatar.png</a> </figcaption>
</div>
<p>Read more about ShellSharks And Mike’s logo creation process here:
<a href="https://shellsharks.com/">https://shellsharks.com/</a></p>
<h2>Iconography</h2>
<p>A major influence was one of my favorite movies growing up, Treasure Planet– Disney’s sci-fi adaptation of Treasure Island by Robert Louis Stevenson.</p>
<p><em>(Spoilers ahead.)</em> In the film, the legendary pirate Captain Flint is able to amass a vast fortune by using a portal that opens to remote destinations across the galaxy, and stores it all on Treasure Planet– ‘the loot of a thousand worlds’.</p>
<div class="image">
  <img src="/Assets/images/postimages/makingofthelogo/portal.png" alt="Screenshot taken from Treasure Planet's Portal Concept.">
  <figcaption>In the movie, the portal is described as "A big door...opening and closing." 
  Source: <a href="https://wallpapers.com/wallpapers/treasure-planet-portal-gzvgg1dbevc8elxy.html">
    wallpapers.com</a>
</figcaption>
</div>
<p>In my logo, that portal represents knowledge, while each planet symbolizes a domain of cybersecurity. The largest planet is the red giant, which represents red teaming and offensive security, placed at the bottom to reflect how foundational it is to my interest in cybersecurity. At the top there is a moon, which is there because in the movie, there’s a spaceport which looks like a crescent moon, until the camera zooms in and you realize it’s  actually full of ships and activity. In my design, the moon represents community, knowledge sharing, and technical communication, and it is at the top of the triangle because I believe that it’s the most important aspect of cybersecurity.</p>
<div class="image">
  <img src="/Assets/images/postimages/makingofthelogo/montressor.png" alt="Montressor spaceport.">
  <figcaption>Montressor Space Port up close.  <a href="https://preview.redd.it/q09vtjd12z551.png?width=1080&crop=smart&auto=webp&s=1f1ff9ea5d14e277fbb95fdf37aa1997739366ac"> Source:</a>
</figcaption>
</div>
<p>The smaller brown planet represents low-level and hardware hacking, marked with a microprocessor and PCB patterns to show my interest in hardware and low level systems. Lastly, The larger orange planet stands for infrastructure and defensive security, featuring a shield with an eye to represent vigilance and protection. I would have made this blue team planet actually blue, but I wanted to keep the clean aesthetic by using a matching color palette for my website’s color scheme.</p>
<h2>Closing</h2>
<p>Anyways, I had a blast putting this logo together, and I'm quite satisfied with how it came out. Huge shoutout to <a href="https://www.photopea.com/" >Photopea.com</a> for allowing users like me free access to a professional-level toolset.
<span class="end-of-article">&lt;/&gt;</span></p>
<div class="image">
  <img src="/Assets/images/LogoV2.png" alt="My Logo">
</div>

    ]]></content>
  </entry>
  <entry>
    <title>BACL Musings</title>
    <link href="https://saucedasecurity.com/posts/BACLReflections/"/>
    <updated>2026-02-03T00:00:00Z</updated>
    <id>https://saucedasecurity.com/posts/BACLReflections/</id>
    <content type="html"><![CDATA[
      <h2>What I Learned Working at the Bay Area Cyber League</h2>
<p>I have had many awesome teachers, mentors, peers, and connections throughout the years. I am also sure to have many more, since my career is just getting started. As my favorite networking professor imparted though, if you accomplished something, it's only half the battle. However, my graduation from Cabrillo College also led to a natural close on my three year stint as part of the Bay Area Cyber League Team.</p>
<h3>Who, or what is the Bay Area Cyber League?</h3>
<div class="image">
  <img src="/Assets/images/postimages/BACL/baclheader2020.png" alt="BACL's website header from 2020.">
  <figcaption>Bay Area Cyber League's 2020 website - Source: https://web.archive.org/</figcaption>
</div>
<p>The Bay Area Cyber League (or BACL), is a non profit organization devoted to increasing cybersecurity education for high school and community college students in underserved communities. In other words, through federal funding and grants, they offer free cybersecurity education, focusing on cyber camps, competitions, and other events. Here's their website: https://baycyber.net/.</p>
<p>Working with the Bay Area Cyber League gave me experience on both sides of cybersecurity education: front-facing teaching and also backend curriculum (and infrastructure) development. Working both sides forced me to slow down, zoom out, and think about how systems, and people actually work.</p>
<h3>Education &amp; Teaching Cyber Camps</h3>
<p>I cannot lie, I quite enjoyed the particular challenge associated with Cyber Camps. Despite being a young adult while teaching these camps, these young students still managed to inspire me for the classes that will follow mine. Some of the kids, despite their youth, are incredibly advanced, and it was truly an honor to have been part of their journey, wherever it leads. A lot of the students are quick learners and question everything, which encouraged me to be quick with answers, and honest if there was something I didn't know off the top of my head.</p>
<div class="image">
  <img src="/Assets/images/postimages/BACL/westvalleycollege.png" alt="West Valley Camp">
  <figcaption>BACL's West Valley College Cyber Camp. Source: https://baycyber.net/</figcaption>
</div>
<p>One of the biggest things I learned is how beginners actually learn. Since I didn't really have a structured path for most of my learning (like almost everyone in cybersecurity, I was largely self taught), I was almost as new to the idea of a cybersecurity curriculum as some of the students. Most of the time, concepts aren't too complex, but what's missing is context. Students usually got stuck because instructions assumed knowledge they didn't have yet, or because they couldn't see how one step connected to the next. Once that context clicked, things moved fast.</p>
<p>At the same time, I learned the importance of not being overly hand-holdy. There's a balance between giving enough guidance to prevent frustration and giving students space to struggle productively. Letting someone wrestle with a problem (instead of jumping in immediately) often led to better understanding and confidence (although it DID lead to some frustration from campers looking to take shortcuts, especially when they knew I was gate-keeping the answer).</p>
<div class="image">
  <img src="/Assets/images/postimages/BACL/ncltraining.png" alt="Zoom NCL training session">
  <figcaption>Screenshot from one of our NCL Training meetings.</figcaption>
</div>
<p>I also learned how to not always be the leader. I tend to jump in and take ownership of tasks, especially when I know I'm well suited for a role. Part of being a good team member, though, is stepping back and letting others take the reins- even if it's something you're particularly good at. One example that comes to mind occurred during our National Cyber League (NCL) preparational camp. The NCL is basically a nation-wide CTF, meant to help students bridge the gap between theoretical knowledge and career-worthy experience. For the competition, there are nine domains the challenges are split into: Web Application Exploitation, Open-Source Intelligence (OSINT), Password Cracking, Network Traffic Analysis, Forensics, Scanning &amp; Reconnaissance, Enumeration &amp; Exploitation (Reverse Engineering), Log Analysis, and Cryptography. For that project, our group of five mentors was tasked with developing a curriculum that would prepare the students for the challenges they would encounter during the NCL. We split the nine domains between us, and while I would have been happy to take categories that I was best in, I ended up with two categories that no one else wanted. Instead of complaining or trying to switch to suit my strengths, I gave others space to step into those roles. That choice let others grow, and it pushed me to work outside my comfort zone and support the team rather than defaulting to a leadership position.</p>
<h3>Development &amp; Infrastructure</h3>
<p>On the technical side, I learned how to divide and delegate work among peers without a rigid structure. On the dev side, we were usually given a project and told, essentially, &quot;make it work.&quot; Task distribution was never a clean, even split— it changed constantly depending on the goal, deadlines, and who had momentum at the time. It brought me a lot closer with my coworkers and taught me that communication regarding how work gets divided is just as important as doing 'your part'. Especially when there are multiple moving pieces that need to work in sync.</p>
<div class="image">
  <img src="/Assets/images/postimages/BACL/ingress.png" alt=".yaml file controlling ctfd ingress.">
  <figcaption>One of the .yaml configuration files- this section controlls ingressing.</figcaption>
</div>
<p>I also learned professionalism in a learning environment. This wasn't a homelab experiment— the systems had real users and real expectations (and real deadlines). That meant communicating clearly, documenting decisions, and owning any mistakes instead of hiding them, which led to everyone helping each other more. And there were mistakes indeed, such as accidentally breaking the containers, misconfiguring .yaml files, or even when one of our team members accidentally exposed some code secrets- luckily we caught it within a few hours.</p>
<blockquote>
<p>Running a container locally is easy. Deploying it at scale is not.</p>
</blockquote>
<p>Working with Docker and Kubernetes showed me what challenges you face when you have real users hitting real services at the same time, across multiple community colleges in the Bay Area. Suddenly, things like persistent volumes, networking rules, and ingress configurations actually matter. When something broke, I couldn't guess— I had to read logs, inspect events, and debug under pressure to get the systems back online, instead of just pulling the plug or starting over.</p>
<h3>Flexibility When Plans Change</h3>
<p>Another major lesson was adaptability. In February 2025, a federal funding freeze forced a complete project pivot. The regional competition had originally been designed around students pentesting a simulated hospital network filled with HIPAA red herrings and realistic misconfigurations, closely modeled after how healthcare environments actually operate.</p>
<div class="image">
  <img src="/Assets/images/postimages/BACL/hospitaltopology.png" alt="Hospotal Topology Packet Tracer Screenshot">
  <figcaption>Screenshot taken early on from our hospital topology development. </figcaption>
</div>
<p>When that project was scrapped in favor of a Jeopardy-style CTF, the work didn't disappear— it transformed. I took parts of what I had learned and helped turn it into a smaller-scale incident response tabletop exercise with friends. That experience taught me that no work is wasted, and that being flexible is just as important as being technical.</p>
<h2>Closing Thoughts</h2>
<p>Overall, my time working with the Bay Area Cyber League reinforced that cybersecurity is as much about people, systems, and adaptability as it is about technical skill. Teaching forced me to not only understand the fundamentals solidly, but also explain them at different levels of abstraction and context. Working on development and infrastructure sharpened my Cloud-Native Infrastructure skills, while being part of the team taught me professional communication. I'm incredibly grateful for my years at Bay Cyber League, and excited to apply what I learned in this chapter of my career towards the next one. <span class="end-of-article">&lt;/&gt;</span></p>
<div class="image">
  <img src="/Assets/images/postimages/BACL/cabrillocollegecamp.png" alt="Cabrillo Cybercamp.">
  <figcaption>BACL Cabrillo Summer Cyber Camp- there are many like it, but this one was mine! Source: https://baycyber.net/</figcaption>
</div>

    ]]></content>
  </entry>
  <entry>
    <title>Sticky Keys Sidequest</title>
    <link href="https://saucedasecurity.com/projects/sticky-keys-exploit/"/>
    <updated>2026-01-27T00:00:00Z</updated>
    <id>https://saucedasecurity.com/projects/sticky-keys-exploit/</id>
    <content type="html"><![CDATA[
      <hr>
<h2>Overview</h2>
<div class="image">
  <img src="/Assets/images/projectimages/stickykeys/stickykeyspopup.png" alt="Sticky Keys popup dialog" />
  <figcaption>
    "The Windows Sticky Keys accessibility prompt shown at the login screen."
  </figcaption>
</div>
<p>As any family's resident &quot;tech guy&quot;, I tend to get handed a lot of the e-junk from people in my life. One thing I got a few years ago was my dad's old workstation, an OptiPlex. At first, when I plugged it in, I could hear fans start, then die. I tried again, and this time it only lasted a couple seconds before it died–still nothing on the monitor. Once more I attempted to power it on, and this time it stayed on. Third time was the charm, but still nothing posted. It was time to do some digging.</p>
<p>Once the dust storm cleared, I could immediately tell that the hard drive was not plugged in–well, that's an easy fix. Next, there was a warning that the video card was not plugged in and that I would need an adapter. I looked at the hardware and there was a dedicated graphics card with a DVI output– I was using HDMI and didn't have an adapter on hand, so I just took out the graphics card. Success! It finally booted and I heard that nostalgic Windows chime. But this wasn't a Windows 11, 10, or even 8 machine. It was running Windows 7, which had its mainstream support end in 2015. Despite the workstation's old age, it presented me with a login screen (for which the username and password were LONG gone). Thus, it was time to go into hacker mode.</p>
<p>A quick Google search later revealed an interestingly (but adeptly) named exploit called the &quot;Sticky Keys Exploit&quot;. The way that it works is by exploiting an accessibility feature built into the Windows OS called &quot;Sticky Keys&quot;.</p>
<h3>Scope &amp; Authorization</h3>
<p>This testing was conducted on a Windows 7 system, operated offline, for educational and defensive security research purposes only. I conducted this testing ethically, with express authorization.</p>
<h3>What is the Sticky Keys Hack?</h3>
<p>If you've ever been frustrated or bored at your computer before, there's a decent chance you have pressed the Shift key five times in quick succession and triggered a pop up dialogue box asking: &quot;do you want to turn on Sticky Keys?&quot;, accompanied by a loud beep. Sticky Keys as a feature aims to help computer users who have difficulty pressing two keys simultaneously (typically a modifier key such as 'Ctrl' or 'Shift' and an accompanying key) by allowing them to press single keys to create combinations instead. However, the exploit works by replacing the executable file responsible for Sticky Keys with the executable for Command Prompt. Sticky Keys is launched by Winlogon as SYSTEM, and replacing it causes cmd.exe to also inherit SYSTEM context, which is later triggered by just pressing the Shift key five times. This is an extremely dangerous vulnerability, and while it's not a huge threat to hardened systems, it successfully circumvents older/unpatched systems just fine.</p>
<p>You might wonder why map cmd.exe to the Sticky Keys executable if you already need administrative level access to do that, and the answer is: you don't need to. You could run exploits from the command line at the recovery mode step of this hack. A slight clarification here is that what you're bypassing is OS authentication. The point of the exploit is to gain persistence and pre-authenticated access.</p>
<p>Once the elevated Command Prompt is mapped to Sticky Keys, it gives you: system-level access from the login screen. It gives you a shell without having to provide credentials, even after reboot. In other words, you have a backdoor into the system, even if your account is revoked or the machine is restarted. In a real world scenario, this attack could happen if someone is given admin briefly– through a misconfiguration or unattended machine, or something like that. An attacker could perform the Sticky Keys attack, leave, and come back later when the opportunity is better. Although it took me a while, an attacker who has practiced and prepared could walk in with nothing but a USB stick, restart and boot a computer into the Windows Recovery Environment (WinRE), run three commands, and have persistent access.</p>
<p>Anyways, nothing is ever as straightforward as it seems. As I pressed F8 at the Windows startup menu, I was unpleased to be thwarted by a login prompt to access repair mode. Good OPSEC, but annoying for an attacker such as myself. While the software-level security controls are decent, the physical security is weak, since there is a way to bypass the repair mode security controls. The way to do so is if you boot from external media (like a USB, or floppy disk LOL), you can still access the Windows installation. Thus, I set off to create a bootable Windows 7 USB.</p>
<h3>Creating Windows Installation Media</h3>
<p>The first step is to download a Windows 7 ISO, because I don't have one readily available. Finding a safe Windows 7 .ISO in 2025 was more difficult than you might imagine, but I found one published on internet archive that had MD5 and SHA-1 hashes listed, and while both of those are deprecated and outdated by modern standards, some peace of mind is better than no peace of mind. In case you're curious, here is the link: https://archive.org/details/windows-7-sp0-sp1-msdn-iso-files-en-de-ru-tr-x86-x64/5.%20Windows%207%20Home%20Premium%20Hologram%20DVD%20x86%20English.png</p>
<p>As for which tool to use, I have been using Rufus for many years now and it's definitely my favorite tool for creating bootable media (sorry, Balena Etcher and Ventoy). Once the bootable media was created, it was time to boot from it and test my workaround.</p>
<div class="image">
  <img src="/Assets/images/projectimages/stickykeys/Hashcompare.png" alt="Hash Comparison" />
  <figcaption>
    "When downloading sketchy system images, you definitely should compare the file hashes!"
  </figcaption>
</div>
Naturally, any good sidequest has to keep one entertained. If it's too easy, it's not fun (I hit another snag). Basically, to boot from a USB (the BIOS was password locked), I had to find a workaround for the workaround.
<h3>Unlocking a password-locked BIOS</h3>
<p>I started with looking up passwords using the serial number, a trick I know has worked before (Shoutout to my friend Toma, with whom I discovered this website). The website I used was: <a href="https://bios-pw.org/">bios-pw.org</a>, which is a good resource for the future. In this case, the passwords didn't work, so I tried removing the CMOS battery. I first tried for 15 minutes and that didn't work, so I made sure I drained the computer of all lasting power and then retried it, for a full 20 minutes, which also did not work. Perhaps the password is stored in a separate BIOS chip, who knows. At this point, I realized I would have to go deeper, and started looking online for information. This video about jumping the password pins from My IT workshop really helped.* I have not jumped CMOS pins before this, so I'm glad I have a new tool in my belt to help for the future (although I did do a jumper attack on a door call box in the physical security village at RSAC 2025, here's a picture of my friend Jeremy also trying it):</p>
<div class="image">
  <img src="/Assets/images/projectimages/stickykeys/JumpingJeremy.jpg.png" alt="Jumping CMOS Pins" />
  <figcaption>
    "Jumping the CMOS password pins – my friend Jeremy giving it a shot."
  </figcaption>
</div>
<p>Anyways, jumping it gave me this message:</p>
<div class="image">
  <img src="/Assets/images/projectimages/stickykeys/dellsecuritymanager.png" alt="Override Message" />
  <figcaption>
    "Physical security was the weak link."
  </figcaption>
</div>
<p>And shortly after, I was in! I could now change the boot sequence and boot from external media. Although I had to go and find tweezers to be able to get that jumper pin out from the small form factor OptiPlex 3010, it was worth the effort.</p>
<div class="image">
  <img src="/Assets/images/projectimages/stickykeys/unlockedbootsequence.png" alt="Unlocked Boot Sequence" />
  <figcaption>
    "Another small victory, but the war is not yet won."
  </figcaption>
</div>
<p>Continuing on my side quest, I plugged in the USB and booted from it and held my breath, only to be met with another issue. BIOS wasn't in UEFI mode, so I had to change then I had to switch the boot mode back into legacy. Also, the Windows ISO that I had downloaded was incompatible with the version of Windows I was trying to recover. I hypothesized it was due to a mismatch between the Windows 7 Professional installation on the drive but the Windows 7 Ultimate installation on the boot media. In reality, it was more likely the UEFI vs Legacy mismatch, but at the time I downloaded a new .ISO and remade the bootable USB. Then, it allowed me to access recovery tools!</p>
<div class="image">
  <img src="/Assets/images/projectimages/stickykeys/biosoruefi.jpeg" alt="Rufus BIOS or UEFI warning message" />
  <figcaption>
    "While I originally set the computer to use UEFI, it would have been better to just recreate the drive from the get‑go."
  </figcaption>
</div>
<h3>Windows Recovery Enviroment</h3>
<p>The pentester in me, when met with a blinking shell, immediately wrote &quot;whoami&quot;. Interestingly, this command did not successfully run. The reason behind it is that WinRE uses a minimal environment, which is missing many standard binaries, including whoami. I also ran into other issues, including that the operating system was not found. Turns out, there was an error caused by having the bootable USB in UEFI when the main system disk was in Legacy mode (BIOS). I remade the USB stick and now the operating system was able to access the files correctly.</p>
<p>Anyways, here are the commands I used. First, I used &quot;c:&quot; to switch into the &quot;c:&quot; drive, followed by &quot;dir&quot;, and a confirmation that the &quot;windows&quot; directory was present, which proved I was in the right place. If you are following along, just note that your main system drive might be D: instead of C:, as WinRE often mounts the system drive differently.</p>
<pre><code>C: 
dir
</code></pre>
<p>Then, I copied the Sticky Keys Executable (sethc.exe) to the root of the C:\ drive in order to have a backup of sethc.exe so I could cover my tracks later.</p>
<pre><code>copy c:\windows\system32\sethc.exe c:\
</code></pre>
<p>Then I copied cmd.exe over sethc.exe:</p>
<pre><code>copy c:\windows\system32\cmd.exe c:\windows\system32\sethc.exe
</code></pre>
<p>At this point, the Sticky Keys hack had been completed! Now I rebooted the PC and pressed Shift a bunch of times at the login.</p>
<p>Then, when the prompt came up, I used net user (at the login screen), and I changed my dad's password, and then logged on.</p>
<div class="image">
  <img src="/Assets/images/projectimages/stickykeys/netuser.jpeg" alt="Using net user to change password" />
  <figcaption>
    "In this example, I changed my dad's password to 'newpassword!'."
  </figcaption>
</div>
<h2>Impact</h2>
<p>While one might expect that such an outdated attack is no longer relevant in an AI-driven detection filled world, it's still very much a problem. According to StatCounter OS market share data, an estimated 3.8% of the world's computers still run Windows 7 in December of 2025.</p>
<p>That number may seem small, but it means that out of the over 1.5 billion active Windows PCs, some 57 million systems are still running Windows 7, and are vulnerable to this hack. Additionally, while I have not personally tested these other versions, I have read reports that tested and successfully exploited the Sticky Keys hack on Windows 8, Vista, XP, and even 10 and 11. However, newer versions of Windows require much more complexity, as System32 is protected by Windows Resource Protection, Secure Boot and BitLocker, which means to successfully pull off this attack on a newer machine, you would have to modify the Windows Registry or Access Control Lists offline.</p>
<h3>How to defend and protect against this attack</h3>
<p>From a defensive standpoint, the Sticky Keys hack fails against hardened systems. A password‑locked BIOS, when combined with proper physical security, prevents changing the boot order, disabling external boot devices, or disabling secure boot or 'UEFI-only' mode. Proper physical security means that to prevent an attacker from being able to jump the pins and bypass BIOS authentication as I did, you can lock the PC or server room. Additionally, implementing a file integrity monitoring tool will detect a change and can also detect persistence by watching out for other files an attacker would change once in.</p>
<h3>Lessons Learned</h3>
<p>Along with a sense of satisfaction for finally triumphing over an old, outdated security system (which still required multiple of the myriad tricks up my sleeve), I also gained some important insight from this project: physical security matters. Also, firmware security does not equal OS security.</p>
<p>As for the next evolution from this sidequest, my next project will be to write a file integrity monitoring system that will help detect when files such as sethc.exe have been changed, because that's one of the best ways to detect such attacks. <span class="end-of-article">&lt;/&gt;</span></p>
<div class="references-box">
  <h3>Sources & References</h3>
  <ul>
    <li>Microsoft documentation on Sticky Keys / Winlogon: <a href="https://www.microsoft.com/en-us/surface/do-more-with-surface/defining-sticky-keys" target="_blank" rel="noopener noreferrer">https://www.microsoft.com/en-us/surface/do-more-with-surface/defining-sticky-keys</a></li>
    <li>StatCounter Global Stats — Windows Version Market Share: <a href="https://gs.statcounter.com/windows-version-market-share/desktop/worldwide" target="_blank" rel="noopener noreferrer">https://gs.statcounter.com/windows-version-market-share/desktop/worldwide</a></li>
    <li>Rufus (Bootable Media Creation Tool): <a href="https://rufus.ie/" target="_blank" rel="noopener noreferrer">https://rufus.ie/</a></li>
    <li>BIOS password recovery resource: <a href="https://bios-pw.org/" target="_blank" rel="noopener noreferrer">https://bios-pw.org/</a></li>
    <li>My IT Workshop — CMOS jumper password reset video: <a href="https://www.youtube.com/watch?v=lKoRY7NL6vI" target="_blank" rel="noopener noreferrer">https://www.youtube.com/watch?v=lKoRY7NL6vI</a></li>
    <li>Internet Archive — Windows 7 Original (x86–x64) MSDN ISO Files (SP0–SP1): <a href="https://archive.org/details/windows-7-sp0-sp1-msdn-iso-files-en-de-ru-tr-x86-x64/5.%20Windows%207%20Home%20Premium%20Hologram%20DVD%20x86%20English.png" target="_blank" rel="noopener noreferrer">https://archive.org/details/windows-7-sp0-sp1-msdn-iso-files-en-de-ru-tr-x86-x64/5.%20Windows%207%20Home%20Premium%20Hologram%20DVD%20x86%20English.png</a></li>
  </ul>
</div>

    ]]></content>
  </entry>
  <entry>
    <title>CS404 - A Reflection</title>
    <link href="https://saucedasecurity.com/posts/cs404reflections/"/>
    <updated>2026-01-19T00:00:00Z</updated>
    <id>https://saucedasecurity.com/posts/cs404reflections/</id>
    <content type="html"><![CDATA[
      <div class="image">
  <img src="/Assets/images/postimages/CS404/cs400.jpg" alt="CS404 Reflection">
  <figcaption>'C-S-4-0-0' reporting for duty. </figcaption>
</div>
<p>As the start of 2026 rolls around, marking the beginning of my time at WGU, I find myself reflecting on my previous cybersecurity &quot;chapters&quot; of life. By far, my favorite was the year I started CS404 at Cabrillo College.</p>
<p>While many of these memories are deeply personal to me and my friends, I've pushed myself to write about them about them because this website IS supposed to be a portfolio, after all. While I don't believe that a blog post could ever truly show off everything CS404 managed to do and become, I can at least attempt to tell the story.</p>
<h2>The Start of CS404</h2>
<p>CS404 started as an idea in my head, that I could create a community space centered around cybersecurity and ethical hacking. I have to give credit to Elizabeth Shaw- my mentor and good friend, who sort of floated the idea of starting a club at Cabrillo. While not many members of the club actually know this, CS404 started back in my high school. It was much smaller back then, often just myself and two other people- a fact that I attribute to both the small school, and the difficulties that came with having a 30-45 minute lunch window (which was often shortened to 25 minutes thanks to long lunch lines and rule changes that no longer allowed students to eat indoors). The small and unknown nature of the club earned it its name (CyberSecurity 404- Not Found). Anyways, after minimal success with the club in high school, I came to Cabrillo ready to leave the idea in the past. But Elizabeth encouraged me to try again. That decision—to jump back in—led to countless memories, friendships, and a great deal of personal growth.</p>
<h3>CS404 v2.00</h3>
<div class="image">
  <img src="/Assets/images/postimages/CS404/clubfair.png" alt="Picture of me an Lupe at Cabrillo's clubfair.">
  <figcaption>Lupe and I tabling at Cabrillo's Club Fair. In retrospect, I wish our sign up list was digital rather than pen and paper; it took an FBI handwriting analysis unit to read some of the email signups. </figcaption>
</div>
<p>To become a chartered club at Cabrillo, I needed a minimum of six people: four officers and two members (not including a faculty advisor). The first step was finding the three other leaders, a step that pushed me well out of my comfort zone. Coming from a small high school where almost no one shared my interest in cybersecurity, I was not super hopeful about finding like-minded people. I emailed my professors in my core classes with an announcement and waited. A few days later, I received an email from someone interested in joining the club. That small victory was what I needed to push me to continue my campaign- and I did have to push outside of my comfort zone. I consider myself an extrovert, so the problem wasn't talking to new people, it was the fear of rejection that they wouldn't want to join the club. I straight up asked a guy in my CIS-83 Enterprise Networking class after it had ended: &quot;Hey, what's up. Do you like cybersecurity?&quot; And sparked a spiel about my proposed club. Jeremy responded by laughing, and reached into his backpack, took out a folder, and opened it to reveal he had already made a poster for an &quot;IT club&quot;- a similar venture. Needless to say, he jumped on board immediately.</p>
<div class="image">
  <img src="/Assets/images/postimages/CS404/outreach.jfif" alt="Picture taken at one of our meetings.">
  <figcaption>Jeremy and I representing our club and college at the Santa Cruz County of Education's Computer Science Education Week. </figcaption>
</div>
<p>As for our last officer (Lupe), I accosted him at the on-campus gym we both went to, and infamously lured him in by downplaying the commitment. I told him: &quot;Yeah, I mean, it's super low-key, just like an hour or two a week&quot;, which I thought was true at the time. We still laugh about it to this day.</p>
<blockquote>
<p>&quot;Just one to two hours a week, Lupe...&quot;</p>
</blockquote>
<h3>Our First Meeting</h3>
<p>Fast forward to our first meeting, when I was nervous that no one would show up. Slowly, we had the first few people trickle in, just as timid as we were: &quot;Is this the cybersecurity club meeting?&quot; With each new person, I felt a small confirmation that the club was filling a real need. By the time we started the slideshow, about 20 people were in the room. I was shocked—and ecstatic. The amount of people that had turned out was a sign of validation (which I often used as a metric for success, a pitfall that I later realized— more people does not equal better club membership).</p>
<div class="image">
  <img src="/Assets/images/postimages/CS404/clubmeeting.webp" alt="Picture taken at one of our meetings.">
  <figcaption>A picture taken at one of our meetings. Jeremy is going over some WiFi Fundamentals before getting to the fun stuff, Deauthentication Attacks and WPA/WPA2-PSK handshake cracking. </figcaption>
</div>
<p>We ended up adopting the 'slideshow method' to teach our members, going over a wide range of topics, from Asymmetric Key Encryption, to Wifi Cracking, ARP poisoning, and SQL injections— and everything in between. We often followed the slideshow up by doing hands-on guided labs together. Over the next year, we also found that the larger purpose of our club was to create a community— a need that had been largely unfulfilled since COVID-19 largely killed group socializing. I remember talking to Marcelo (one of the best professors at Cabrillo, and our Club Advisor) about it at the time, and he said that a club like this had never existed at Cabrillo. They had an IT group that met, but it had died out seven or eight years before ours started— an eternity for a two year community college. We did a wide variety of events, from bi-weekly movie nights (of course we watched Hackers, and Wargames and other hacker-culture relevant movies), hosted cybersecurity ethics discussions, and even a faculty panel and beach bonfire (both of which were among our most memorable events). We even attended other local security conferences, and had the opportunity to collaborate with UCSC students at their campus at a &quot;CNSA + CS404 BBQ&quot;. There were many other events as well, but you get the idea. All of these were things I had dreamed of during high school, but never had the numbers or backing to make it happen.</p>
<div class="image">
  <img src="/Assets/images/postimages/CS404/postercollage.png" alt="Poster Collage">
  <figcaption>A collage made up from some of our posters from our events.</figcaption>
</div>
<p>Those events were a large part of why we had a lot of support from the faculty, and frankly, I got maybe TOO much leniency from my professors when it came to procrastinating classwork and turning in late work, which was another lesson I learned in organizing workload and forcing productive prioritization. While all of these events were a cornerstone of why the cybersecurity club garnered campus-wide attention, it came at a few costs, namely, a large time commitment that myself and the other officers and club members that stepped into leadership roles put into the slideshows, hands-on labs, event planning and coordination, marketing, and of course, the bureaucracy (which was most definitely the hardest part).</p>
<div class="image">
  <img src="/Assets/images/postimages/CS404/Facultypanel.png" alt="A picture taken during CS404's Faculty Panel">
  <figcaption>Events that included our professors, such as the CIS faculty panel we hosted, definitely helped get faculty support for our club.</figcaption>
</div>
<h3>ICC Breaucracy</h3>
<p>The ICC (or inter-club-council) is the governing entity of Cabrillo's Clubs, who provide regulation and consistency for clubs in terms of administrative organization. However, learning to adhere to the ICC's rules was an extensive, tedious, and, at-times, perplexing task. I won't delve deep into the politics here, but as an example: the ICC starts every meeting with a motion to start the meeting, which requires a participant to second and confirmation of no objections (or it would be put to a vote), and they expected clubs to have that same level of formality, (which frankly, had no place in clubs like mine or 'Sudoko Club', for example). The strict red tape made it so that even though our club had earned funding with the college, we never spent a cent of our club's funds. The reason lies in the complexity required to spend any amount of the club's money. Even something as menial as renting a $2.99 movie for a movie night required adding items to public agendas by certain deadlines, member roll calls taken at weekly meetings, votes cast, minutes taken, forms filled, and— of course, ICC approval. The entire process would take quite some time, and even more to get reimbursed (I did only one event where I applied for funding and got approval, then paid for the items. It took over three months and a myriad of emails, including one to Cabrillo's HR Department, to get reimbursed). This caused us to instead on internal and external contributions to host events (Costco Pizza was a big help), which in turn fostered our club's sense of comraderie. Either way, dislike of the ICC's strict policies did not come solely from my club, but from a lot of others After I graduated Cabrillo, I heard there was, ironically, a movement led by the philosophy club to reformm it— though as far as I know it was ultimately put out.</p>
<div class="image">
  <img src="/Assets/images/postimages/CS404/cs404sticker.jpg" alt="One of our stickers proudly represented on a members' laptop.">
  <figcaption>One of our stickers proudly represented on a members' laptop.</figcaption>
</div>
<h3>CS404 Evolution</h3>
<p>After the end of our first year, CS404 as a group decided to become an unofficial club, which allowed us more time to just hack together, instead of spending time on paperwork and mandatory ICC meetings. I still stand by the decision, because since then, CS404 merged into a group of friends casually hanging out, instead of a full fledged student union- which has given a lot of time back to the officers and members who were involved at the leadership level. Although I am glad CS404 ultimately found its place outside of a campus organization, I will admit that learning how to adhere to the bureaucratic rules as the leader of an organization was ultimately a net positive. Paperwork is what makes the world go round, and I am certain that in my life I will eventually encounter another situation where I will have strict bureacracies to deal with. Having said that, CS404 continues to meet (even at the time of writing), and it was definitely the correct decision for the current officers to go underground with the club, and focus instead on hands-on hacking, and fostering the sense of community. Last I heard, the current leadership is interested in developing outreach to the larger Santa Cruz Cybersecurity community through local libraries and such.</p>
<div class="image">
  <img src="/Assets/images/postimages/CS404/bonfire.webp" alt="A picture taken during CS404's bonfire night.">
  <figcaption>A picture taken during CS404's bonfire night.</figcaption>
</div>
<p>Ultimately, the story of CS404 is a long and traveled one, but at the end of the day we accomplished way more than I could have ever thought possible, and I certainly learned and practiced a lot of new skills- from public speaking, leadership, and communication, to time management and problem solving— this club was an incredible learning opportunity for me that I won't ever forget. <span class="end-of-article">&lt;/&gt;</span></p>
<div class="references-box">
  <h3>Further Reading</h3>
  <ul>
    <li>CS404 — Official Website: <a href="https://cs404.org/" target="_blank" rel="noopener noreferrer">https://cs404.org/</a></li>
    <li>Article written by Cabrillo's Student Newspaper about CS404: <a href="https://thecabrillovoice.com/2960/student-clubs/cabrillos-cyber-security-of-the-future/" target="_blank" rel="noopener noreferrer">https://thecabrillovoice.com/2960/student-clubs/cabrillos-cyber-security-of-the-future/</a></li>
  </ul>
</div>

    ]]></content>
  </entry>
  <entry>
    <title>Shrek KOTH</title>
    <link href="https://saucedasecurity.com/posts/ShrekKOTH/"/>
    <updated>2025-06-15T00:00:00Z</updated>
    <id>https://saucedasecurity.com/posts/ShrekKOTH/</id>
    <content type="html"><![CDATA[
      <p>These are my notes on how I obtained root on the 'Shrek' King-of-the-Hill (KOTH) box. Some images may show different IP addresses since I recreated parts of the process afterwards to gather better documentation. The overall methodology and attack path is unchanged.</p>
<div class="disclaimer">
  <h3>Scope & Authorization</h3>
  <p>All techniques shown were performed in an authorized environment for educational purposes only. Do not attempt these methods on systems you do not own or have permission to test.</p>
</div>
<h2>Initial Enumeration</h2>
<p>First, a scan for open ports:</p>
<pre><code class="language-bash">nmap -sV 10.10.147.211
</code></pre>
<p>While that was running, I took the time to see if there were any webpages up. Being a CTF challenge, naturally there was.</p>
<div class="image">
  <img src="/Assets/images/postimages/ShrekKOTH/shrekwebpic.png" alt="Picture of the webpage">
</div>
<p>An interesting HTML comment I noticed while looking through the page's code was the following:</p>
<div class="image">
  <img src="/Assets/images/postimages/ShrekKOTH/shrekislikeanonion.png" alt="Interesting HTML comment on shrek page">
</div>
<p>When decoded, it says &quot;shrekai&quot;. Possibly a password, but to what? I decided to dig deeper on the website. Let's look at robots.txt. This is a text file placed in the root directory of a website that tells search engine web crawlers where to 'crawl', and it also tells them where NOT to crawl. Naturally, robots.txt doesn't actually enforce access control, it just provides compliant crawlers with 'guidelines'. In this case, the Disallow pointed to an interesting endpoint:</p>
<div class="image">
  <img src="/Assets/images/postimages/ShrekKOTH/disallow.png" alt="Shrek's Robots.txt page">
</div>
<p>This tells us where to look, and when we visit that endpoint we get a juicy RSA key.</p>
<div class="image">
  <img src="/Assets/images/postimages/ShrekKOTH/rsakey.png" alt="Picture of the RSA key found">
</div>
<p>In the mean time, the scan had finished:</p>
<pre><code>root@ip-10-10-212-181:~# nmap -sV 10.10.147.211

Starting Nmap 7.80 at 2025-06-15 01:39 BST

Nmap scan report for 10.10.147.211
Host is up (0.00015s latency).
Not shown: 993 closed ports

PORT     STATE SERVICE VERSION
21/tcp   open  ftp     vsftpd 3.0.2
22/tcp   open  ssh     OpenSSH 7.4 (protocol 2.0)
80/tcp   open  http    Apache httpd 2.4.6 (CentOS) PHP/7.1.33
3306/tcp open  mysql   MySQL (unauthorized)
8009/tcp open  ajp13   Apache Jserv (Protocol v1.3)
8080/tcp open  http    Apache Tomcat/Coyote JSP engine 1.1
9999/tcp open  http    unknown service

Service Info: OS: Unix

Nmap done: 1 IP address (1 host up) scanned in 88.62 seconds
</code></pre>
<p>This is perfect, because this RSA key presumably belongs to the SSH or Tomcat server, since this is a CTF. In the real world, it could belong to anything or anyone, but for the sake of this writeup, let's try SSH first. It's also more or less safe to assume the username will be Shrek, since that fits the theme.</p>
<pre><code class="language-bash">ssh shrek@10.10.212.181
</code></pre>
<p>For my first attempt at the password, I tried &quot;shrekai&quot; from the HTML found earlier. This did not work, and other low-hanging fruit such as &quot;shrek&quot; or &quot;shrek password&quot;, did not work. Thus, the next step was to use the RSA key. To use this key, first I copied it into a file (and renamed it shrekkey), but if you don't change the permissions, SSH will yell at you:</p>
<div class="image">
  <img src="/Assets/images/postimages/ShrekKOTH/shrekkeyperms.png" alt="Fixing the permissions for shrek key">
</div>
<p>To fix the permissions:</p>
<pre><code class="language-bash">chmod 600 shrekkey
</code></pre>
<p>Then Let's retry the command, specifying the private key for public-key authentication:</p>
<pre><code class="language-bash">ssh -i shrekkey shrek@10.10.212.181
</code></pre>
<p>This ran successfully, I had popped a shell, and there was a flag immediately in the shrek directory:</p>
<div class="image">
  <img src="/Assets/images/postimages/ShrekKOTH/shrekflag.png" alt="contents of the shrek flag">
</div>
<h2>Privilege Escalation</h2>
<p>The script named check.sh piqued my interest, so I catted it.</p>
<div class="image">
  <img src="/Assets/images/postimages/ShrekKOTH/catcheckscript.png" alt="The check script contents.">
</div>
<p>The script pointed the date into the temp folder. I poked around a bit but I didn't have permission to execute the script, or the tmp directory (which I've seen in other KOTHs).</p>
<p>I decided to see what was in the tmp directory:</p>
<div class="image">
  <img src="/Assets/images/postimages/ShrekKOTH/tempdirectorycontents.png" alt="contents of the temp directory">
</div>
<p>While poking around though, I did see that there was a LOT in the tmp directory, including a script that is basically a telnet reverse shell. I played around with it, getting another shell without having to put in a password, but the issue is it only gives the perms that it's been run with. I'm looking to get root, so this discovery doesn't help. I also found a script that was a default system wrapper used to gate the execution of anacron, preventing scheduled jobs from running more than once per day or while the system was on battery power. While at first appearing targetable, upon closer inspection it was a standard root-owned file with no writable components or shrek-controlled execution paths, offering no viable escalation vector.</p>
<p>In King of the Hill, you have to have root access to be able to write your username in the root/king.txt file and claim &quot;king&quot;. Thus, we're now looking for privilege escalation opportunities. While there was a LOT more in the tmp directory, I decided to kick it up a notch and start looking for SUID binaries.</p>
<p>SUID, or Set User ID is a special permission bit set on executable files that allow a user to execute the binary with the permissions of the file's owner, not the user who runs it. In many cases, these files are owned by root. This is used, for example, if a user wanted to modify a system-owned file, such as changing a password using /usr/bin/passwd. However, with certain conditions met, such as writable binaries or dependent files, command execution, or improperly handled environment variables, an attacker can take advantage of these conditions and run commands as root. To search for these SUID binaries on the machine:</p>
<pre><code class="language-bash">find / -type f -perm -4000 -exec ls -l {} \;
</code></pre>
<p><strong>Breakdown:</strong> find is a tool to query the filesystem. Starting it at &quot;/&quot; means you will start your search in the root directory. -Type f specifies only files, and setup uid 4000 permission means a user can execute the file with the permissions of root. The other half executes list -l for long form, and the curly brackets are placeholders, so it can put in each result from the find command. ; terminates the executed command.</p>
<p>And here were the results:</p>
<div class="image">
  <img src="/Assets/images/postimages/ShrekKOTH/findcommand.png" alt="Find command's results.">
</div>
<p>From this list, there are multiple potential targets, but the one I selected was GDB. The reason I chose this is because GDB, or GNU-DeBugging, which is a built in tool for… debugging. We can leverage its tool capabilities for privilege escalation. Now, GDB has its own set of commands, and if you were to just enter GDB and type something like whoami, it will not work:</p>
<div class="image">
  <img src="/Assets/images/postimages/ShrekKOTH/gdbhelp.png" alt="GDB has specific commands">
</div>
<p>However, GDB is already running as root and includes built-in Python scripting support. That means we can execute Python code directly inside GDB. From that embedded Python interpreter, we can import Python's os module and make low-level system calls, similar to what you'd normally do from a shell.</p>
<p>When we call os.execl(), GDB replaces itself with a new process. Pointing it at /bin/sh tells the system to start a shell instead of continuing to run GDB. The &quot;sh&quot; argument simply sets the process name, and the &quot;-p&quot; flag tells the shell to keep the elevated privileges that GDB was started with rather than dropping them:</p>
<pre><code class="language-bash">gdb -nx -ex 'python import os; os.execl(&quot;/bin/sh&quot;, &quot;sh&quot;, &quot;-p&quot;)'
</code></pre>
<p>Success! We now have a root shell and can find the other flags.</p>
<div class="image">
  <img src="/Assets/images/postimages/ShrekKOTH/rootpic.png" alt="Whoami output returns root">
</div>
<p>Don't forget to both add your username to the root/king.txt file, and also patch these permissions. <span class="end-of-article">&lt;/&gt;</span></p>

    ]]></content>
  </entry>
  <entry>
    <title>Hacker Graduation Cap</title>
    <link href="https://saucedasecurity.com/projects/hacker-graduation-cap/"/>
    <updated>2025-05-25T00:00:00Z</updated>
    <id>https://saucedasecurity.com/projects/hacker-graduation-cap/</id>
    <content type="html"><![CDATA[
      <h3>Project Overview</h3>
<p>This project started around four days or so before I was set to walk at my graduation from Cabrillo College. My mom saw me trying on my gown and cap and she asked me: &quot;Are you going to decorate it?&quot;, which I had already decided against. I liked the minimal look, and I was planning on wearing some sashes and a lei anyway, which I told her. She responded: &quot;Why don't you make something with tech?&quot;</p>
<p>These seven simple words got me thinking: &quot;Why don't I make something with wearable tech? My entire time at Cabrillo has been very tech and cybersecurity oriented. Why don't I make a project that embodies that?&quot;</p>
<div class="image">
  <img src="/Assets/images/projectimages/GradCap/Bismarck_pickelhaube.jpg" alt="Bismarck with a Pickelhaube" style="max-width: 50%; height: auto;" />
  <figcaption>
    "This picture actually did come up when figuring out how to style a 2.4 GHz 3DBI WiFi antenna on my graduation cap." 
    Source: <a href="https://simple.wikipedia.org/wiki/File:Bismarck_pickelhaube.jpg" target="_blank">Wikipedia</a>
  </figcaption>
</div>
<p>I started thinking about decorating my cap, which led to my first ideas: I had an Arduino and ESP32 and some 16x2 LCD matrix screens hanging around. While I knew the ESP32 had the capabilities to broadcast an access point, and could control the screens, I wasn't sure how to tie it all together on the cap. I finally realized that a lot of people will be on their phones at the graduation (long speeches, hundreds of names being called, lots of waiting for your brief moment on stage– I can understand why, especially with the short attention span of modern young adults, a lot of people would be on their phones instead of paying attention). What does everyone in the middle of a football field with bad reception love to see on their phones? Free Wi-Fi. The project had already started to form in my mind.</p>
<h3>The Working Concept</h3>
<p>So my final working concept was this: on my graduation cap, I would have two LCD screens opposite each other. They would be broadcasting congratulatory scrolling messages on repeat to anyone who could see my cap. Additionally, the ESP32 would be broadcasting an SSID named &quot;Graduation Cap Wi-Fi&quot;. Now, because of the lack of authentication, many curious and bored students would likely connect to it, which upon doing, immediately pops up a captive portal. Most captive portals ask for credentials, or to accept the terms and conditions before connecting to the website, but not this one. The captive portal simply asks: &quot;What's been a highlight for you from your time at Cabrillo?&quot; and then compiles them on the &quot;Highlight Wall&quot; page.</p>
<p>A couple of quick notes: I thought about making it so the highlights could dynamically be added to the scrolling LCD's messages, but I figured the anonymous nature of a message board tends to attract the worst in peoples' inner self-expression. In other words, I was preparing for the fact that not all messages would be uplifting. To counter this, I considered having a feature where I could actively approve any incoming messages to either be displayed or not, but I didn't want to be the student on my phone the whole time. Additionally, I considered active word filtering to automate approval based on message content, but frankly, people are creative and there would be no time to create a 100% foolproof word filter. Instead I opted to just have a list of predetermined, safe-to-wear messages on the LCDs and the 'highlight wall' part of the web app could be a free-for-all.</p>
<h3>Build time</h3>
<p>I immediately divided the project into two halves. The script + physical cabling that runs and controls the LCD messages, and the web app + Wi-Fi Access Point.</p>
<h3>Message Code + Physical Cabling</h3>
<p>The idea to have two LCD screens was to have one in the front and one in the back of the cap, each with the same message being shown. It was not overly difficult to wire up the LCD screens, since I used the rails of the breadboard to connect the LCDs identically, taking up half the pin space on the ESP32. Eventually, I evolved the script to include individual transmissions for each LCD, drawing from the same bank of messages, such as &quot;Congrats Graduates&quot; or &quot;CS404 for life&quot;.</p>
<p>Side note, if you're new here, <a href="/posts/cs404reflections/">click here to read about CS404</a></p>
<div class="image">
  <img src="/Assets/images/projectimages/GradCap/LCDScreenPinOut.png" alt="LCD Screen Pinout" />
  <figcaption>
    "A wiring diagram for a single 16x2 LCD screen powered by an ESP32, with a potentiometer to control screen contrast."
  </figcaption>
</div>
<div class="image">
  <img src="/Assets/images/projectimages/GradCap/GradCapPrototyping.png" alt="Grad Cap Prototyping" />
  <figcaption>
    "Testing that both screens work."
  </figcaption>
</div>
<p>The largest setback I reached on this project was that my FTDI to USB adapter for programming the ESP32 was very selective about when it chose to work, and I even tried using Arduino as a Serial connector, but that didn't work well either. Another thing that took a while to get correct was putting GPIO0 to ground as a reset, and timing it after booting it (you have to reboot the ESP32-CAM each time you wanted to reflash it). I tried changing the baud rate, changing the ESP32's flash mode (dio vs qio), making sure the ground connection was good, and even installing different drivers for the FTDI programmer, and swapping the physical ESP32 for another that I had laying around. Eventually, after going through the checklist for everything that could go wrong, I realized that the jumper on the FTDI was on the wrong pins. Just like any good project, the victory was short lived before running into more bugs. A couple of filesystem issues, source code for libraries not installing correctly, and my personal favorite- the ESP32 got stuck in a crash loop that blinded me with its LED camera flash every few seconds. I Guess I know what it's like to have paparazzi now.</p>
<h3>Web App + Wi-Fi Access Point</h3>
<div class="image">
  <img src="/Assets/images/projectimages/GradCap/GradCapSketch.png" alt="Grad Cap Sketch" />
  <figcaption>
    "Snippet of code in the Arduino sketch– I know dark mode gives you more lines per second, oh well."
  </figcaption>
</div>
<p>The first step in this process was to get the ESP32 to broadcast an SSID. The ESP32 has three standard Wi-Fi modes- Station mode (STA), AP mode (access point), and AP + STA mode (it also has ESP-NOW, which is a connectionless protocol meant to send small messages between ESP boards, but it's not relevant for this project). Station mode means the esp32 acts as a client, AP mode means the ESP32 creates its own Wi-Fi network, allowing other devices to connect to it and AP + STA mode means the ESP32 functions as both a client and an access point, enabling complex networking setups. For the sake of this project, I really only needed AP mode, although I could see some future developments of the project using AP + STA mode. I whipped up a quick HTML page, and used the &lt;WiFi.h&gt; and &lt;ESPAsyncWebServer.h&gt; libraries to serve a webserver on port 80.</p>
<div class="image">
  <img src="/Assets/images/projectimages/GradCap/GradCapSSID.png" alt="Grad Cap SSID" />
  <figcaption>
    "Got the SSID working."
  </figcaption>
</div>
The next problem was storage–if the ESP32 isn't connected to a cloud service, I needed user input to be stored locally, and then served on the webserver. The original script used the ESP32's RAM, but that is extremely limited (520KB), and I wanted highlights to be persistent across resets, so I could read them after the ceremony and celebratory family and friends dinner was over. I switched from the ESP32-WROOM-32 I was using for testing to an ESP32 - CAM, which comes with a built-in SD card slot, making memory no longer an issue. The next problem was that the ESPAsyncWebServer library I was using struggled against multiple TCP connections because it uses lwIP (lightweight IP), and wasn't handling the TCP/IP stack correctly in AP mode. I didn't know this at the time but the author, Hristo Gochkov, knew about this issue and made a fork to address this exact issue. At the time, I just switched libraries into WebServer.h. After fixing some compiling issues, I got the script where I wanted it. Next, I had to make sure that the captive portal opened with no extra steps, so that each student would automatically see the page after connecting. The problem is that there is no way to force either Android or Apple phones to open a page in a browser after connecting to Wi-Fi (or so I thought). Both operating systems automatically look for certain domains or a login page to identify captive portals. To increase our chances of getting our web app opened automatically, I figured I could add requests to those endpoints (/captive-portal, /redirect, /generate_204, etc), until ChatGPT informed me of another method- Captive DNS redirection. The way that this works is basically intercepting all DNS traffic from unauthenticated users and returning the captive webserver's IP (which in this case is the same as the router's IP address, but it still forces a traffic redirect). This method still doesn't work on all phones (especially newer iPhones), but it still increases our chances. This works because some operating systems detect captive portals by requesting a specific URL, and ESP32 may intercept those requests and redirect them to my portal page. After some more tweaking and fine-tuning (including fixing a bug that made the ESP32 indicator light flash on at any time the server was interacted with), I managed to make the script work exactly as intended.
<h3>Project Limitations &amp; The Cold Hard Truth</h3>
<p>I mentioned earlier that I had divided the project into two parts. There was a third half, which was equally important- assembling the working prototype into a form factor that was wearable for the big day. Ideally the final product would be visually appealing to wear, safe, and secure enough to survive potentially being thrown in the air. The third part of the project, unfortunately, did not come to fruition quite as I had hoped.</p>
<div class="image">
  <img src="/Assets/images/projectimages/GradCap/WearablePrototype.jpg" alt="Wearable Prototype" />
  <figcaption>
    "Between running out of flux and messing up wiring schematics, I didn't get much further than this in the assembly part."
  </figcaption>
</div>
<p><em>&quot;Between running out of flux and messing up wiring schematics, I didn't get much further than this in the assembly part.&quot;</em></p>
<p>While working on this project, I developed tunnel vision. The project was all I thought about for those four days leading up to graduation. I had already turned in all my schoolwork, and finished all my finals. The last week of school was free, which encouraged optimism about completing the project in time. However, as you've already read, this project (like many others) required a lot of small moving bits, working together in tandem. It was the day of Graduation, and I was still soldering the components to a circuit board, and attaching the circuit board to the cap. While the software and individual hardware components were functional, the final integration phase proved to be the most time-constrained, leaving little room for iteration. Around that point, I had experienced the two quintessential eleventh-hour epiphanies.</p>
<blockquote>
<ol>
<li>My desk is too small. It doesn't matter how big it is, it's always too small. And secondly, the realization that hit me harder:</li>
</ol>
</blockquote>
<p>It was impossible to finish on time– there was no time left. I was less than a few hours away from the start of the ceremony, and I still had to change, drive over, park, check in, and do all of the graduate things. As unfortunate as it was, I realized that I had to cut my losses, and focus on actually attending my graduation. It was a bittersweet moment, because I was proud to have overcome all the small obstacles and created a working version of my vision, only to be robbed of using it for its ultimate purpose by the clock running out. Ultimately, I'm glad that I took on this project, even if the project reached a functional but not fully wearable state by graduation day. I learned a lot from this project, and it kept me occupied until right before it was time to go to the ceremony. While I wish my mom would have asked me about cap decorating sooner, I know that I gave the project 100% effort, even with such a limited deadline- which, at the end of the day, is something to feel good about. <span class="end-of-article">&lt;/&gt;</span></p>
<div class="image">
  <img src="/Assets/images/projectimages/GradCap/GraduationDay.png" alt="Graduation Day" style="max-width: 50%; height: auto;" />
  <figcaption>
    "Post-grad."
  </figcaption>
</div>
    ]]></content>
  </entry>
  <entry>
    <title>My First Experience at BSides SF</title>
    <link href="https://saucedasecurity.com/posts/bsidessf/"/>
    <updated>2024-09-09T00:00:00Z</updated>
    <id>https://saucedasecurity.com/posts/bsidessf/</id>
    <content type="html"><![CDATA[
      <div class="image">
  <img src="/Assets/images/postimages/SFBSides/bsideswebsiteheader2023.png" alt="bsides header">
  <figcaption>The header of the BSides website (bsidessf.org) back in 2023.</figcaption>
</div>
<p>Hello Hackers! Today's post is going to be a bit more in the blog style—a reflection on my experience at a local hacker convention. What is B Sides? Why does it exist, why is it called BSides, and what even happens at a hacker convention anyway?</p>
<h3>What is BSides?</h3>
<p>Well, the story actually starts with a different hacker conference, among the most famous in the world: BlackHat. Started in 1997, &quot;Black Hat has grown from a single annual conference in Las Vegas to a global conference series with annual events in Tokyo, Amsterdam, Las Vegas, and Washington, DC&quot; (taken from Blackhat.com). In 2024 alone, there were over 20,000 participants in the USA, with &quot;more than 100 selected briefings&quot; over the course of the 'Main' Conference. While that might not sound like a particularly high number, when you take into account that the 'Main' Conference takes place over just two days with all levels of specialized cybersecurity training on the other four days, the ratio of content-to-attendees seems a lot more balanced. However, attending this large conference has a price, with the cheapest, early-bird tickets setting you back $2,599*. What happens to cybersecurity enthusiasts who would like the chance to socialize with their peers, listen to talks, attend workshops, get hands-on experience, and network with potential employers, but can't afford the hefty ticket price on top of a flight and hotel to Las Vegas during peak travel season? Some of my readers might be screaming, 'Def Con!' Although DefCon is another, arguably more, renowned hacker convention that also takes place during Summer in Vegas, it too suffers from the same problems stemming from high participation.</p>
<p>Enter BSides. BSides became the alternative event for many presenters who had their talks rejected from being included in the Black Hat program, just because of the high volume of applicants. BSides was started with this problem in mind—even its name (taken from the &quot;B-Side&quot; of a vinyl record) reflects their mission to provide the community with an alternative, approachable, and affordable conference for everyone—students, seasoned professionals, vendors, and everyone in between</p>
<p>If you've been reading this blog post closely, you'll notice that earlier I prefaced this article as being about my experience attending a &quot;local hacker convention,&quot; while also mentioning that BSides has its roots in Las Vegas. Without doxing myself, I will make it public that I live in the Bay Area. So how to explain this disparity? Well, while the first BSides did in fact happen in Las Vegas, Nevada, in 2009, it's since grown exponentially due to the community's love of the concept. And who wouldn't love the concept? BSides is an entirely volunteer-run and outsider-friendly conference. To maintain its accessibility and low costs for attendees even in spite of increased popularity, BSides has started sprouting grassroots conferences in major cities around the world—over 50 conferences worldwide, all loosely tied together!</p>
<p>The best part? Every single one is unique, based on the interests of the local community. Every BSides has a local events page where potential participants can submit theme ideas and topics they're interested in learning about. Now, what to expect at a BSides conference? Again, each one is different, but in this post I'll be talking about my first year attending one—more specifically, BSides San Francisco, 2023.</p>
<p>The first step in attending the event was buying a ticket. Although they were extremely well priced at $75 per person for two full days of talks, including buffet-style food and access to the Saturday night party (more on that later), I managed to attend completely free. As a nonprofit and community event, they require a lot of volunteers to actually keep the conference running, which is why they allow volunteers of a certain number of hours entry for free (I don't recall the number specifically, but I believe I worked about 5-6 hours total). For me, trading two volunteer shifts (of a few hours each) for free access to the rest of the program seemed like a no-brainer. Volunteering came with many other benefits, too—networking opportunities with other volunteers, cool volunteer-exclusive shirts, and it also helped me complete some hours for my high school's community service requirement.</p>
<p>When I first walked into the building, I was immediately struck by the scale of the event. The organizers rented out the City View at Metreon, and there were two large floors; the lower floor was part of the 16-screen movie theater housed there (which happens to be home to the second-largest IMAX screen in the USA).</p>
<div class="image">
  <img src="/Assets/images/postimages/SFBSides/firstfloorview.png" alt="View from first floor">
  <figcaption>The view from the lower floor.</figcaption>
</div>
<p>The larger keynotes were held on the bottom floor.</p>
<div class="image">
  <img src="/Assets/images/postimages/SFBSides/keynoteslides.png" alt="a picture taken from the keynote slideshow">
  <figcaption>The opening keynote presentation must've had the largest slides I've ever seen.</figcaption>
</div>
<p>After the opening ceremony, it was straight into the action: as I took the escalator to the second floor along with hundreds of other people, I was overwhelmed with the scene: vendors' booths lining every wall, selling all sorts of security products, busy workshops, demos, and activities. Because of BSide's strict media policy, I can't post any crowd shots, but the top floor was definitely busy.</p>
<div class="image">
  <img src="/Assets/images/postimages/SFBSides/nightvisiongoggles.png" alt="Vendors' giveaway swag.">
  <figcaption>Some vendors had some super cool giveaways. According to the whiteboard, this company was giving away night-vision goggles!</figcaption>
</div>
<p>After walking around for a bit checking out the booths, I started getting hungry. I walked to the food area and was instantly impressed by how delicious the breakfast food was, with plenty of options—a trend that continued through the day.</p>
<div class="image-grid">
  <img src="/Assets/images/postimages/SFBSides/food1.png" alt="Picture of food">
  <img src="/Assets/images/postimages/SFBSides/food2.png" alt="Picture of food">
  <img src="/Assets/images/postimages/SFBSides/food3.png" alt="Picture of food">
  <figcaption>Basically an all-you can eat buffet—who doesn't like free food?</figcaption>
</div>
<p>To this day, the most creative form of advertising I have seen came from the sponsor of the coffee, which was, of course, free to all attendees and served from multiple kiosks all day.</p>
<div class="image">
  <img src="/Assets/images/postimages/SFBSides/tailscalecoffeelogo.png" alt="Tailscale's logo in my coffee foam.">
  <figcaption>Tailscale, a mesh VPN management service based in Toronto, Canada, knows exactly how to target their intended customers.</figcaption>
</div>
<p>To encourage the less business-oriented participants to interact with the myriad vendors selling products, they implemented a passport raffle system—collect every booth's stamp to be entered in the drawing. Since not everyone wants to spend their time going booth-to-booth, and not everyone who does completes their stamp passport before the midday drawing, the number of participants in the raffle is relatively small—I got lucky and won a book about hacking APIs! Of course, though, I wasn't there for the raffle or the vendor swag (each booth gives out their own free swag); I was there to connect with the community.</p>
<div class="image">
  <img src="/Assets/images/postimages/SFBSides/vendorswag.png" alt="all the stuff I got from vendors.">
  <figcaption>This was all the free stuff I got from visiting the vendors' booths, minus some chocolates and candy I already ate.</figcaption>
</div>
<p>The number of individuals I met and connected with in one single day was a record amount—everyone is there to interact in one form or another. I remember seeing a man with dreadlocks, an expensive suit, and a sleek watch next to a girl with bright pink hair, a skull-and-bones T-shirt, and fingerless gloves—an outfit that walked straight out of a hacker movie. Any conference that can bring together such a wide spectrum of people is doing something right, especially since IT and the tech industry in general often suffers from a lack of diversity.</p>
<div class="image">
  <img src="/Assets/images/postimages/SFBSides/selfiewithben.png" alt="A picture taken with @Nahamsec.">
  <figcaption>Meeting @Nahamsec with my prize book under my arm. There's a saying against meeting your idols, but Ben's out there proving it wrong! (Posted with his consent.)</figcaption>
</div>
<p>Anyways, besides the talks from local talent, which are all available on YouTube if you're curious: <a href="https://www.youtube.com/watch?v=T_YM2P1ZLxs&amp;list=PLbZzXF2qC3RuQAuC0C4Q7Lk4eQluqIVzL&amp;ab_channel=SecurityBSidesSanFrancisco">BSidesSF 2023 - Opening Remarks - Day 1: Reed Loden</a>, there's a lot of other things to keep yourself busy with. For example, there's the badge challenge- this year it was an astronaut badge.</p>
<div class="image">
  <img src="/Assets/images/postimages/SFBSides/astronautbadge.png" alt="A picture of the astronaut badge.">
</div>
<p>'Badgelife', as it's been coined, is the hacker culture that arises from the custom, artistic circuit boards handed out to select participants at some cybersecurity conferences. What started out as a way to prevent ticket counterfeiting has now evolved into legendary challenges—oftentimes the badges hold elaborate puzzles that participants can try to solve. DEFCON (another conference mentioned earlier) started this tradition, with some of the badge challenges requiring multiple days to solve, including using other people's badges—the press badges, the vendor badges, the presenter badge, etc. While I cannot personally write about these crazy challenges, I can highly recommend listening to the Darknet Diaries podcast, episode 43, for a crazy story about how the host, Jack Rhysider, acquired the famous and highly coveted Black Badge from DEFCON. The black badge is the highest honor a DEFCON Attendee can receive (and DEFCON is the largest hacking convention in the world). If you're interested in cybersecurity in general, his podcast is the best out there, and he also posts his transcripts online, so you can read through them like an article (check out darknetdiaries.com/imgs/black-badge-contest.pdf for a taste of what the challenges entail). Although BSides SF's 2023 badge challenge is not quite as intricate, it depicted an astronaut with hidden LED's that would light up when you solved each stage in the challenge. Although I got stuck on the fourth level and eventually moved on since there was a lot to see, some people were walking around with badges that had all six areas lit up.</p>
<p>Additionally, in a lot of cybersecurity conferences, there's the concept of a &quot;village&quot;—a physical area within the event where a certain area of specialization meets. For example, at DefCon, there's a car hacking village where people can watch and learn how to hack cars. There's also a satellite hacking village (and yes, at last year's DefCon there was a targetable Space Force satellite, &quot;Moonlighter,&quot; in low orbit as part of the competition to hack into it). Many fields of cybersecurity are represented more in depth at these villages. At BSides, there was sadly no satellite hacking, but there was an internet-of-things (IOT) village where I learned how to remotely turn off a smart light bulb by running some configuration commands and a Python script. While I want to learn more about how the exploit worked, it was more of a demo to show the potential flaws within these devices. If I had stuck around for longer, I probably would have learned more (especially since there were a couple of guys who were trying their luck at hacking a smart TV and getting a walkthrough from the village experts), but there was a lot to do, so I moved on. The next village I visited was devoted to physical security—AKA Lockpicking Village. By far one of the most crowded villages, locking picking holds a special place with hackers; it's a physical representation of what we do online. To quote one of my favorite TV shows, Mr. Robot:</p>
<blockquote>
<p>&quot;The lock pick. Every hacker's favorite sport. The perfect system to crack, mostly because unlike virtual systems, when you break it, you can feel it. You can see it. You can hear it.&quot; (S1.Ep2).</p>
</blockquote>
<p>At this table, there was this friendly guy named Rick, who helped me build my confidence with picking locks. They had a range of difficulty, from one pin (some small file cabinets only have one pin) all the way up to six (most traditional door knobs have five or six). The more pins, the harder it gets, as you have to line up each pin to a certain height and keep it there (this is called the shear line, and it's why keys have little teeth that push each pin in the lock up to a certain height to enable the cylinder to turn). This post is by no means a lockpicking tutorial, as I'm not an expert, and I should also note that picking locks that you are unauthorized to open is illegal. At lockpicking village, they had all the tools, including tension bars and shims, rakes, and a variety of picks. They even had transparent locks, which helped visualize how locks work. If you're at all interested in how to lockpick, I highly recommend trying, as it can be a useful skill to have, even if you don't think you'll often use it. For example, once at a sports practice, I was able to unlock an equipment bin for my team that my assistant coach didn't have the key to because I had a lockpick set in my backpack (shoutout to Rick). Again though, that was done with permission, and I would recommend against picking locks you're unauthorized to pick.</p>
<div class="image">
  <img src="/Assets/images/postimages/SFBSides/lockpickingvillage.png" alt="A picture taken at the lockpicking village.">
  <figcaption>Another aspect of learning to pick locks is losing trust in all the locks in your life. It's surprisingly easy to pick locks, and if even I can learn the skill in a few minutes, anybody can.</figcaption>
</div>
<p>After walking around the villages, I followed a sign and ducked into this backroom, which was surprisingly large. It seemed like a large conference room with a lot of tables set up, with power strips placed on the tables, and people glued to their computers, laser-focused on their screens.</p>
<div class="image">
  <img src="/Assets/images/postimages/SFBSides/ctfsign.png" alt="A picture of the CTF 'village' sign.">
  <figcaption>The sign I followed.</figcaption>
</div>
<p>On the whiteboard, there was a leaderboard projected. I found an empty spot at a table and immediately connected to the Capture-the-Flag (CTF) platform. The concept of a CTF is to find vulnerabilities intentionally placed by the moderators—these are the 'flags'. Once you exploit a vulnerability, you're presented with a flag you can only find by hacking, which you then verify on the CTF platform for points—the harder the challenge, the more points you receive. They're usually presented in a jeopardy style, with different categories of specialization: open-source intelligence (OSINT), networking, cryptography, web application exploitation, log analysis, password cracking, enumeration, scanning, and more. This was not my first CTF, but this one definitely felt like it had higher stakes, as everyone in the room was working through the challenges and the energy was very high. Also, besides the categories mentioned earlier, the BSides CTF had an in-person challenge—a lock hooked up to a circuit board encased in a small wooden tower—all hooked up to a receipt printer that would provide you the flag if you successfully picked the lock.</p>
<div class="image">
  <img src="/Assets/images/postimages/SFBSides/lockpickingctf.png" alt="A picture of the CTF's in person lockpicking challenge.">
  <figcaption>Just a short while later I got to put my newfound lockpicking skills to the test—although this lock was harder to crack, after some time I too got the receipt to print out.</figcaption>
</div>
<p>Although everyone else seemed to be much more knowledgeable, it was still very fun, and at the end of the day, when the CTF was over, I didn't come in last on the leaderboard. Plus, I got some amusing memories out of it—like the printed 'flag' receipt, which still lives in my room to this day.</p>
<p>The whole BSides event was incredible, but the party on Saturday night was really one of the most memorable experiences. There were the staple party ingredients—food, drinks, music, dancing—but there were also pinball machines, retro arcade games, glow in the dark stars, and a lot of astronaut-themed decor. The organizers even hired entertainers—dance crew @oaklandoriginalz—who put on quite the break dancing show—all while wearing space suit costumes. For their grand finale, they lined up four members from the audience, in order from shortest to tallest, and had them bend over at the waist. Then, the lead dancer got a running start and not only cleared them but did a backflip over them! Although everyone was taking videos, because it has stills of the crowd, I cannot post it, so you'll just have to take my word for it.</p>
<p>In conclusion, BSides SF was an incredible experience and helped me to learn and grow as a student of cybersecurity in more ways than I expected. You make good connections, learn new skills, and get a view into just how broad cybersecurity-related things can be. I would highly recommend anyone interested in checking out cybersecurity conferences to look up their local BSides and attend, or if there isn't one in your city, start one! <span class="end-of-article">&lt;/&gt;</span></p>
<p>*<em>Price in USD, for attending Black Hat USA 2024 in person (including all in-person briefings), taken from the Black Hat Registration page (https://www.blackhat.com/us-24/registration.html).</em></p>
<div class="references-box">
  <h3>References</h3>
  <ul>
    <li>BSides San Francisco — Official Website: <a href="https://bsidessf.org/" target="_blank" rel="noopener noreferrer">https://bsidessf.org/</a></li>
    <li>BSidesSF Talks Playlist — YouTube: <a href="https://www.youtube.com/playlist?list=PLbZzXF2qC3RuQAuC0C4Q7Lk4eQluqIVzL" target="_blank" rel="noopener noreferrer">https://www.youtube.com/playlist?list=PLbZzXF2qC3RuQAuC0C4Q7Lk4eQluqIVzL</a></li>
    <li>BSides Conference Series Overview — InfoSec Conferences: <a href="https://infosec-conferences.com/hub/event-series/bsides/" target="_blank" rel="noopener noreferrer">https://infosec-conferences.com/hub/event-series/bsides/</a></li>
    <li>A History of "Badgelife" — DEF CON's Artistic Circuit Boards (VICE): <a href="https://www.vice.com/en/article/a-history-of-badgelife-def-cons-unlikely-obsession-with-artistic-circuit-boards/" target="_blank" rel="noopener noreferrer">https://www.vice.com/en/article/a-history-of-badgelife-def-cons-unlikely-obsession-with-artistic-circuit-boards/</a></li>
    <li>How DEF CON Hackers Got Involved with the Space Force (Politico): <a href="https://www.politico.com/news/2023/08/11/def-con-hackers-space-force-00110919" target="_blank" rel="noopener noreferrer">https://www.politico.com/news/2023/08/11/def-con-hackers-space-force-00110919</a></li>
    <li>The Coveted DEF CON Black Badge — Adobe Developer Blog: <a href="https://blog.developer.adobe.com/the-coveted-defcon-black-badge-7e5952c0d1bb" target="_blank" rel="noopener noreferrer">https://blog.developer.adobe.com/the-coveted-defcon-black-badge-7e5952c0d1bb</a></li>
  </ul>
</div>

    ]]></content>
  </entry>
</feed>