Linksys E5350 Router Hacking
Overview
This project started while I was trying to add a new wireless addition to my cyber range. While attempting to flash OpenWRT on a random router that I had laying around, I realized I would have to go a step deeper than the traditional firmware upload web endpoint found on some other Linksys routers. For my particular model, the Linksys E5350, there was no such option.
Tools Used
Hardware
- USB-to-serial cable
- Serial cable to FTDI board
- Jumper wires
- Multimeter
- Ethernet cable (for connecting the router and my PC through a local area network)
Software
- PuTTY
- TFTPD64 Server
- OpenWRT
- Hashcat
What Is UART?
Universal Asynchronous Receiver-Transmitter, or UART, is a hardware communication protocol that enables two devices to send and receive data bit-by-bit over two wires: transmit and receive (TX and RX). UART also relies on a shared ground (GND), and occasionally VCC, which provides power.
The asynchronous nature of UART means that devices do not need to share a clock signal. Instead, both sides agree on a communication speed known as the baud rate. This makes UART especially useful for debugging embedded systems, since components such as a microcontroller and sensor can easily communicate, for example.
Oftentimes, UART interfaces are left unsecured on production boards and provide high levels of access. Because UART grants such powerful privileges, manufacturers may remove pin headers or labels to obscure the interface, however with basic hardware knowledge and a multimeter, these pins can usually still be identified. Once connected, UART access often provides the keys to the kingdom in terms of firmware and system internals.
Device Teardown + UART Identification
I began by opening the router and visually inspecting the printed circuit board (PCB) to locate potential UART headers. Typically, UART pins appear as a group of three or four pins aligned in a straight line. After opening the router (which was a challenge on its own), I identified two possible UART locations.
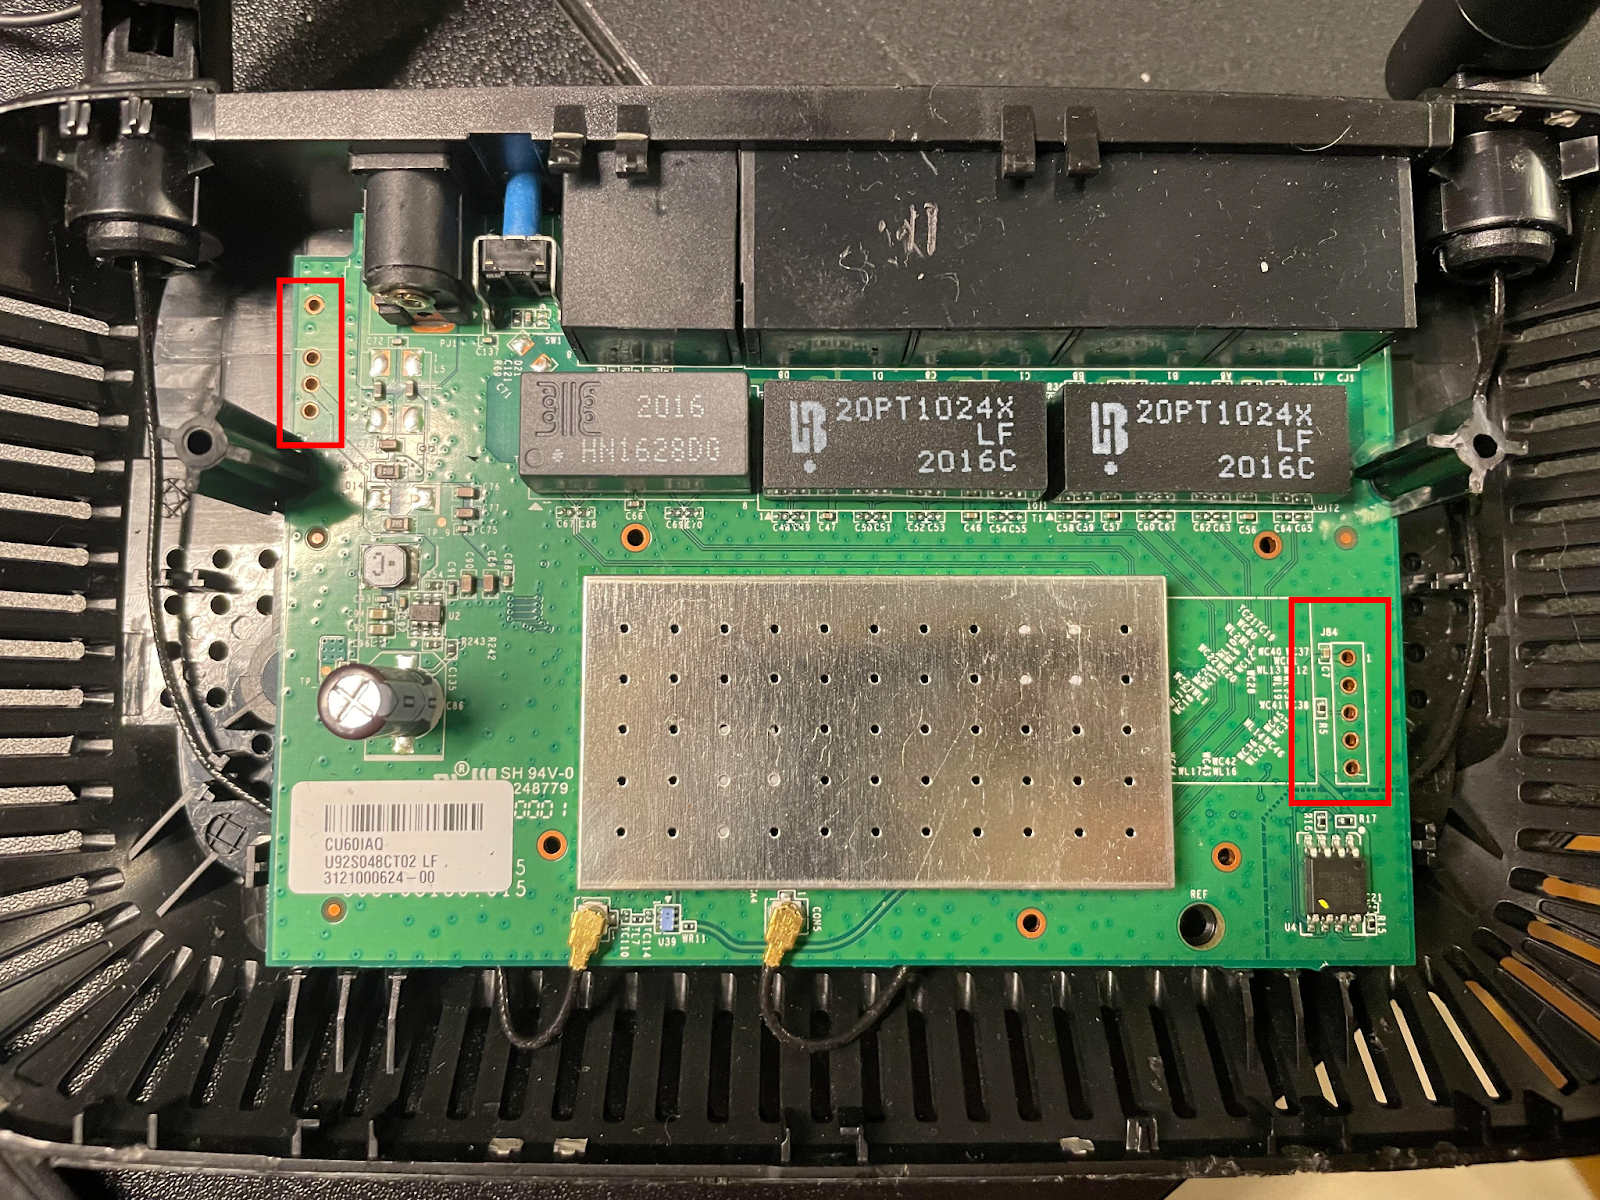
As expected, there were no silkscreen labels, so I used a multimeter to identify the pins. I started by searching for a ground pin using continuity mode.

With the black probe placed on a known metal contact point, I tested each pin, starting with the left. The left header showed no ground connection, but the right header did. My readings were as follows:
- Reading on: 1 / Reading off: 571
- Reading on: 1 / Reading off: 1216
- Reading on: 1007 (most likely TX) / Reading off: 873
- Not connected (NC) — reading 1 both on and off
- Ground — continuity test beeps (measured ~1 while off)
These values vary because the router actively drives voltage across TX and RX lines, causing the multimeter to display different impedance values.
Serial Access
With the likely TX/RX pins identified (Pins 1-3 were the likely suspects), all I needed to do was a bit of trial and error with my serial monitor running to determine which was which.
To accomplish this, I launched PuTTY and selected the correct COM port (COM4 in my case). As for Baud rate, one of the most common default rates for UART communication is 115200, so I started PuTTY there. I also double checked that my FTDI adapter's voltage selection jumper was configured for 3.3V as opposed to 5V, which could potentially damage the router.
After a switch or two, Readable output confirmed the correct configuration. TX and RX corresponded to pins 2 and 3, respectively.
The final setup followed this chain:
USB → Serial → FTDI → UART
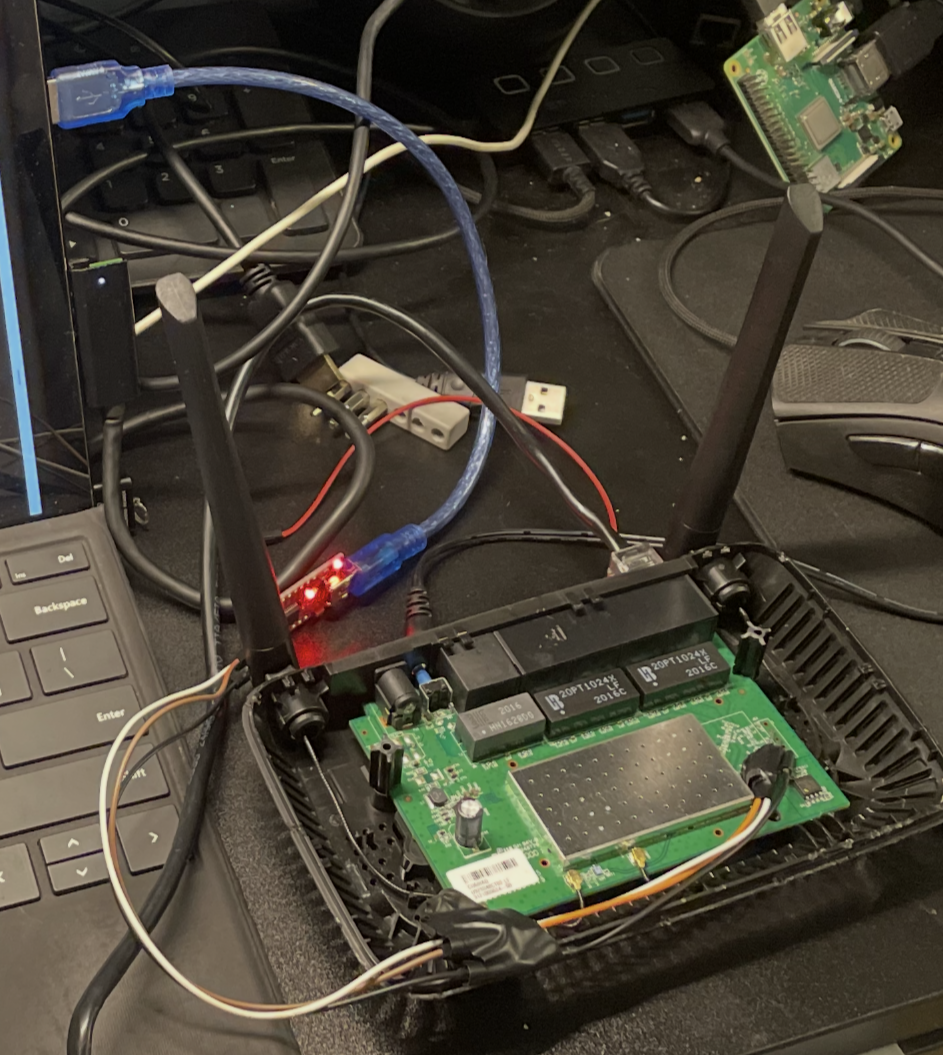
Above is the hacking setup. Using electrical tape to hold the pins in place helped a lot, because even the smallest movements could push them out of contact with the pinouts, and I wanted to avoid soldering them on.
Once connected, I interrupted the boot process using Ctrl + C. After boot completion, the system displayed a # shell prompt.
Privilege Confirmation
To confirm root access, I first attempted to run whoami. This command failed, but not due to a lack of system privileges, but rather on account of the shell environment being BusyBox. BusyBox, AKA the: ‘Swiss Army Knife’ of Embedded Linux, has earned that title because, depending on build configuration, BusyBox contains anywhere from dozens to hundreds of UNIX/Linux commands, all packed into one small executable file. This compactness makes it extremely common to find on a lot of low level IoT devices such as this Linksys E5350 router. While hundreds of commands might sound like a lot, in reality it’s quite stripped down compared to the commands typically available in a full Linux environment. For example, in this BusyBox ash, both whoami and id were unavailable. The third try is the charm, though:
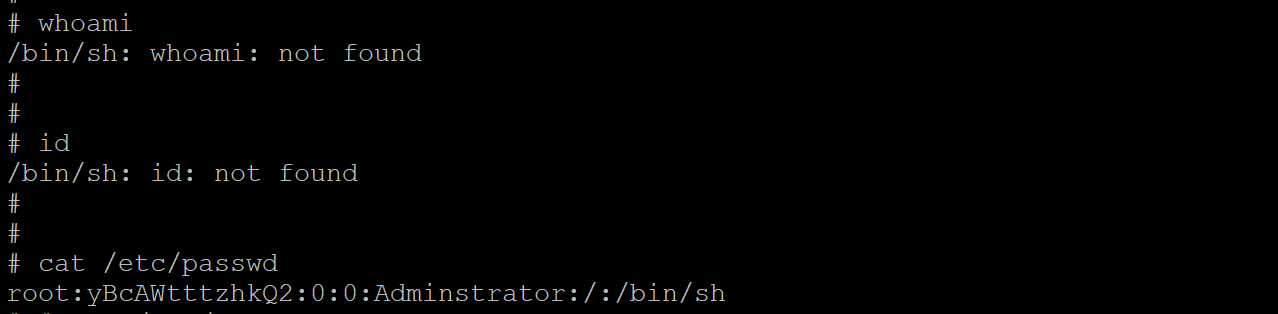
cat /etc/passwd
Success! The shell confirmed the presence of the root user by displaying that our user belongs to 0:0, or UID 0 and GID 0 (granting all privileges). Another confirmation is that we can see the root password hash (which is DES, based on the character length of 13, and it’s quite outdated). Now, before experimenting further, I had to make sure I backed up the firmware, to minimize the risk of accidentally bricking the device.
Firmware Backup
This is where TFTPD64 comes into play. I configured TFTPD64 as a TFTP server using a directory named /openwrt/. After verifying firewall and network connectivity settings, I connected the router to my PC via Ethernet and rebooted it.
To verify network configuration on the router:
ifconfig
From my PC:
ping 192.168.1.10
The ping was sucessful, and everything was lined up, so it was time to proceed. The first thing is to back up the router’s flash layout, available at /proc/mtd:
cat /proc/mtd
I then created a temporary backup directory in RAM, which would be where I could send the files out of:
mkdir /tmp/backup
Using dd, which is a tool for copying raw bytes, I copied each file one at a time (but from the bootloader region of flash, thus /dev/mtdX) into the temporary directory at /tmp/backup, and confirmed they were there:
dd if=/dev/mtd1 of=/tmp/backup/mtd1_bootloader.bin
dd if=/dev/mtd2 of=/tmp/backup/mtd2_config.bin
dd if=/dev/mtd3 of=/tmp/backup/mtd3_factory.bin
dd if=/dev/mtd4 of=/tmp/backup/mtd4_kernel.bin
Then, from /tmp/backup, I ran these commands to push the backup files onto the TFTP server:
tftp -p -l mtd1_bootloader.bin 192.168.1.2
tftp -p -l mtd2_config.bin 192.168.1.2
tftp -p -l mtd3_factory.bin 192.168.1.2
tftp -p -l mtd4_kernel.bin 192.168.1.2
On the TFTPD64 server, I could see the files were writing successfully:
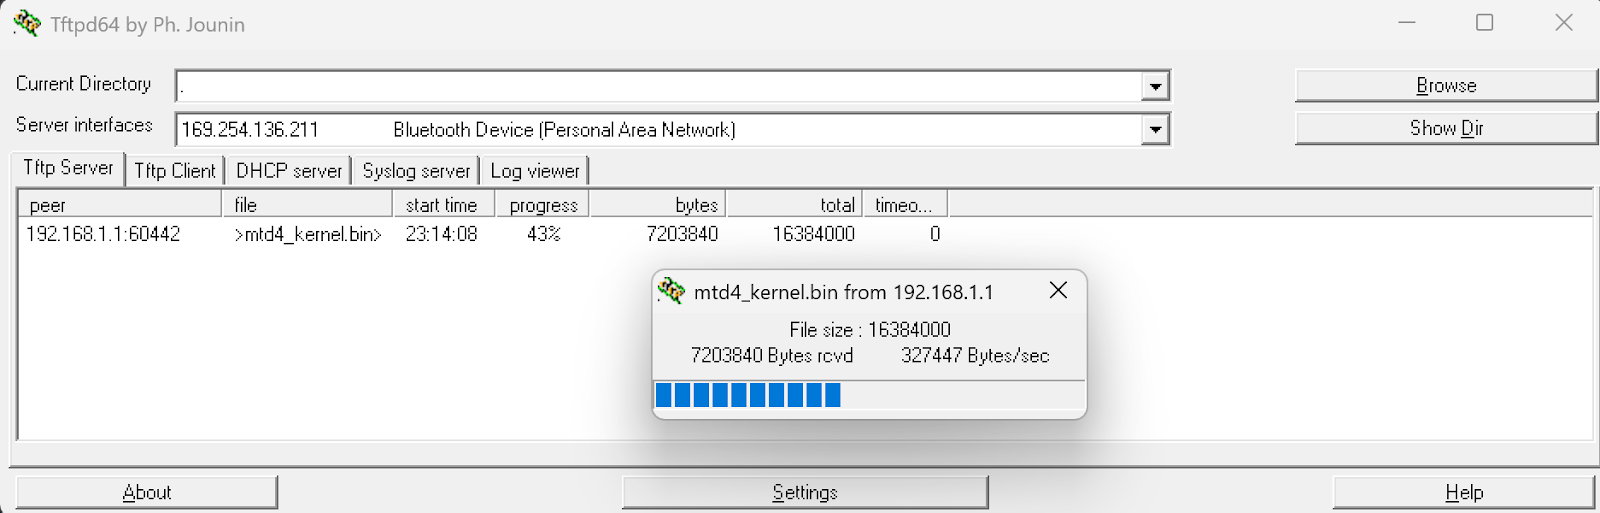
Now that I had a backup of the router’s flash chip, I could recover from bricking the router by restoring its factory settings. That means, if I accidentally flashed OpenWRT to the wrong partition, I can breathe freely, because it’s recoverable. I was free to mess to my heart’s content on the router.
DNS Hijacking
My findings indicate multiple critical vulnerabilities- a direct, unauthenticated root shell on boot,
Which allows an attacker to extract sensitive data such as network passwords, connected device information, and even modify configurations. To demonstrate the damage an attacker could do, I will be finding and changing the DNS configuration on the router.
First, running ps | grep dns to list any processes with dns running:

Then, find / -name "*dnsmasq*" 2>/dev/null, which leads to:
var/run/dnsmasq.pid
/etc/dnsmaq.conf
/bin/dnsmasq
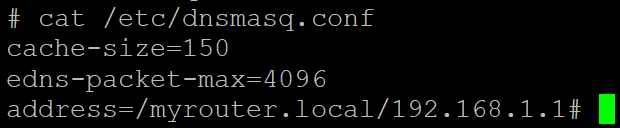
If we open the config file:
cat /etc/dnsmasq.conf
Now, any settings can be changed, and to demonstrate impact– we can choose to exchange our own, malicious DNS server to this configuration for the one currently found in the file:
{
echo "# Attacker DNS Server"
echo "dhcp-option=6,192.168.1.100"
} > /etc/dnsmasq.conf
In the command above, DHCP-option 6 tells clients to now use 192.168.1.100 as their DNS server, meaning whoever controls the 192.168.1.100 server can run phishing attacks by redirecting any sites the clients look up, perform data exfiltration by intercepting traffic, or even malware distribution via fake update servers.
However, if done correctly, this attack can be made much harder to detect, by minimizing the amount of DNS Queries the attacker's server has to handle. By just changing certain addresses, you can make only some websites redirect to a fake website in the user’s browser. In the example below, I demonstrate this with "bankofamerica.com". With enough effort, an attacker could directly replicate the real website, so the user wouldn’t be able to tell the difference, and capture the user’s credentials in order to use them later to steal funds from the user’s bank account.
{
  echo "# Discreet Attack"
  echo "address=/bankofamerica.com/192.168.1.100"
} >> /etc/dnsmasq.conf
The above scenario could happen with email logins, banking sites, really anything the user looks at online. In the example above, the DNS configuration file found at /etc/dnsmasq.conf is only served in RAM, meaning changes made to the file are not persistent. However, with knowledge gained from dumping the flash partitions from earlier (/proc/mtd/), we know that we can make persistence changes in mtd2:config, but I will not be demonstrating that in this article. The purpose of this DNS Hijacking segment is just to showcase potential impact, not act as a guide for anyone to follow (although again, a dedicated attacker could easily figure it out).
Other Security Notes
Additionally, the router’s password storage is unsafe- DES hashes are weak and crackable. With brute forcing, a technique that runs through every possible combination, and DES’s maximum password length of eight characters, it’s not a matter of if, but when, the password is recovered. Furthermore, with additional techniques (like the one I try below to run, called a dictionary attack), or rainbow tables (which use tables of precomputed hashes), this password can be cracked in an even shorter time. Since I already have root, as an attacker, there is no real need to crack this password, however it’s a good opportunity to practice my wordlist creation skills. First though, let’s start with the classic, quintessential weak password wordlist: (rockyou.txt).
What is Rockyou.txt?
RockYou was a company that got hacked back in 2009, and famously kept all their users’ passwords stored in unencrypted plaintext. The wordlist rockyou.txt, containing millions (32 million to be exact) of real users' passwords was compiled from that breach, and from that list, 14 million unique passwords were released as a result. If you’d like to hear more about that story, check out the sources box at the end of the article for a link to Episode 33 of Jack Rhysider’s podcast, Darknet Diaries, which goes into more depth.
Attempting to crack the hash
Anyways, I use Hashcat to try a dictionary attack against this hash.
hashcat.exe -m 1500 -a 0 yBcAWtttzhkQ2 C:\Users\Vinny\Downloads\rockyou.txt
The -m is which type of hash, in this case 1500 for DES, and -a is for the attack mode, with 0 being Dictionary.
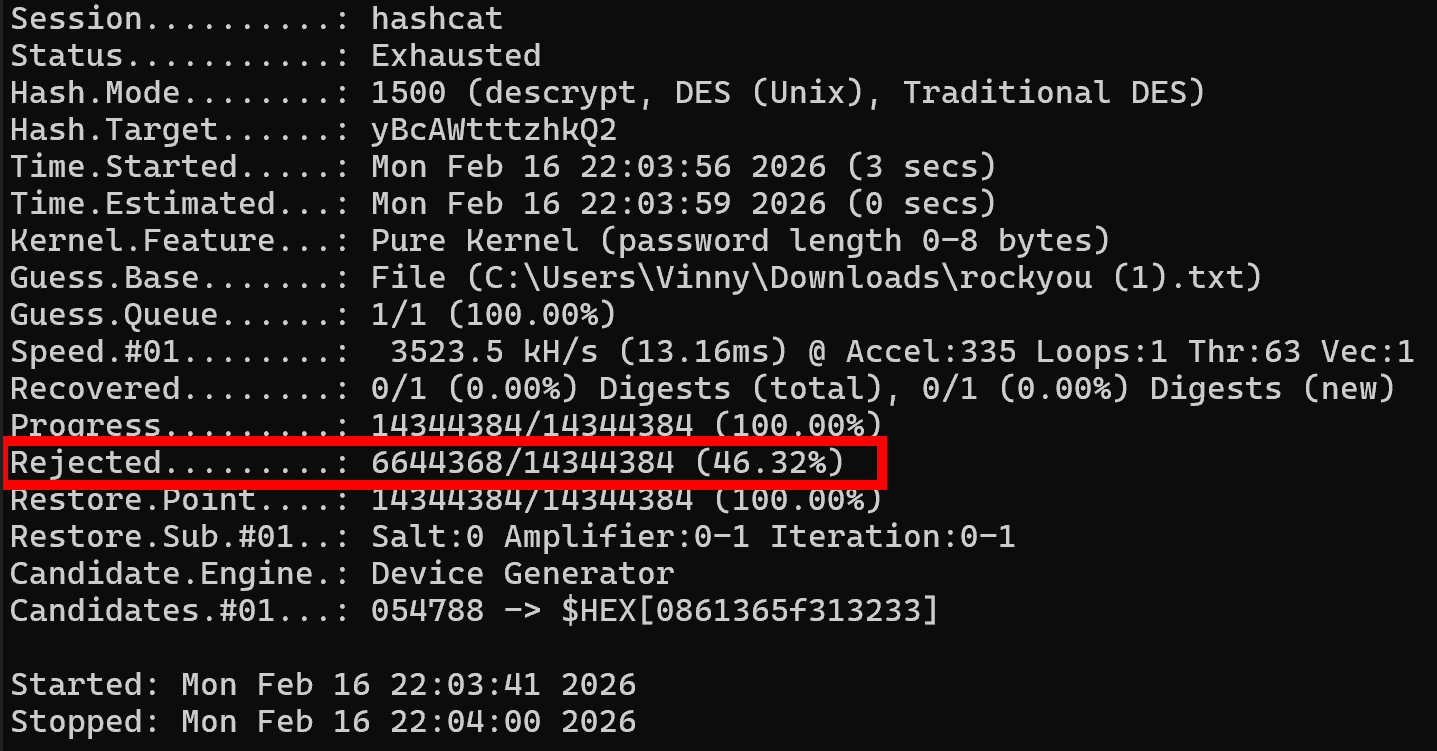
The first pass failed (which means we get to break out some fun rule sets), but it only took 19 seconds for an integrated GPU to try all 14 million passwords in that list (interestingly, Hashcat rejected 46% of passwords in rockyou.txt because they exceeded DES's 8-character maximum length). Before going further, I decided to try bruteforcing all lowercase numbers, to see if it was some kind of numeric password, which was also exhausted without finding a match. Next, I attempted to create a specialized wordlist, using some information from the device, including MAC Address, Default SSID, and Default SSID Password. None of those worked, so I added some rules– appending numbers at the end, reversing the passwords, uppercasing all passwords, Toggling the position of each uppercase at position 0 (example: password → Password), appending common letters, leet speak (for example, password → p4ssw0rd), and even rotations/shifts of letters, etc, giving me thousands of variations of each one of these original dozen password ideas based on device info. Also, looking around on the inside of the router, I discovered a manufacturer sticker placed on the PCB, which I was certain would contain the password, but alas, nothing on that sticker worked either, even with rule sets added.
Since dictionary attacks and light brute forcing failed, I need to change tactics. The password is likely a random value or date; after exhausting millions of common passwords, all numeric combinations, and over 100,000 permutations of device-specific intelligence, it’s clear that finding it without deep brute forcing is unlikely. While my PC hardware isn’t well-suited for sustained brute-force attacks, it’s entirely realistic for attackers to use specialized hardware. Additionally, readily available cloud resources make it so that password-cracking rigs, capable of quickly defeating this password, are extremely accessible.
That’s the direction I plan to take this project next: with conventional approaches exhausted, the logical next step is to hand it off to my cloud-based password cracking setup, which I’ll cover in a future writeup. This portfolio isn’t meant to showcase only successful outcomes, but also my methodology when things don’t work- hence the inclusion of my documented password-cracking attempts on this project.
Impact - Let the truth be told:
Regardless of cracking the password, being able to obtain unauthenticated root privileges on this router is a vulnerability that can lead to an attacker reading and modifying any files- firmware and configurations, potentially serving as an attack vector for someone to use this device to move laterally onto other devices on your network. While this is a real security vulnerability, the exploitability risk factor is low. This vulnerability requires physical interaction with the router, and the risk that a malicious hacker is going to break into someone’s house or business, just to spend 20 minutes breaking open the router and interfacing with it via UART, in order to elevate their attack to some other target, is frankly quite unlikely. It’s more plausible that an attacker could purchase and compromise this device, install a Rootkit to have persistent access, and then pass the router off to their target to use unknowingly. However, that scenario is also improbable. While not a remotely exploitable vulnerability, this project demonstrates systemic IoT security failures that merit a writeup– also, this was a fun lab and it gave me more experience with IoT hacking.
These shortcomings can be used as teaching moments- especially to showcase how weak the principle of security through obscurity (leaving UART exposed but ‘hidden’) can be. UART Debug interfaces persist in production with no authentication, and Physical security is consistently undervalued. Just because a router has no visible screws, does not mean an attacker cannot open the plastic clips.
Lastly, I would like to highlight that these findings represent industry-wide IoT security problems, not just a single device flaw in a random Linksys router. I would like to continue my research on other routers and devices, and eventually showcase and develop other attacks, besides DNS Hijacking, from within my cyber range.
Also, as promised, in Part 2 of this router hacking series, I will document building an automated cloud GPU rig to finish cracking the password. Stay tuned! </>
Sources & References
- TFTPD64: https://pjo2.github.io/tftpd64/
- PuTTY: https://www.chiark.greenend.org.uk/~sgtatham/putty/
- Wikipedia — Data Encryption Standard: https://en.wikipedia.org/wiki/Data_Encryption_Standard
- OpenWRT: https://openwrt.org/
- Hashcat: https://hashcat.net/hashcat/
- RockYou wordlist (GitHub): https://github.com/brannondorsey/naive-hashcat/releases/download/data/rockyou.txt
- Darknet Diaries — Episode 33: https://darknetdiaries.com/episode/33/